[This documentation is still under development, it is being updated regularly]
Welcome to our documentation for Letter.is. This includes documentation and how to’s for all the functionality, features and aspects of Letter.is and related applications. We have tried our best to write this documentation with simplicity and easy-to-read language. Please contact support for any assistant and we will be more than happy to help you out. Contact details are on our homepage.
Table of Contents
Welcome Letter.is
The sole reason Letter.is exist is to protect your privacy. You deserve to communicate privately without your provider selling your data to third party businesses. Majority of the mainstream email providers haunt you with Ads, promotional emails and personal data collection. Letter.is protecting you from data theft and privacy invasion from any party.
We heavily encrypt your emails so nobody can read your emails except the recipient. Even we cannot read your emails. Any communication you do with our service stays within you and the correct recipient, and no other. We do not collect, sell and profit on your personal data. Letter.is fighting to protect your privacy and provide complete security.
With our service, not only you get complete privacy, but lots of other features you cannot get with traditional email service. For every account, there is an admin panel to administrate your account and users. You have Bitwarden, a great password manager that keeps your password in place where your email lives, completely protected and bundled with tons of features. This is not even the surface of what we offer.
While reading this documentation, you will learn to use every functionality and features of Letter.is and all the things we offer. Please contact us if anything seems hard to understand. We are always ready to assist you.
Accessing your admin panel
Admin panel is your central control dashboard, where you can manage your email addresses and users. With the admin panel, you can control every aspect of available mailbox features. After you sign up for Letter.is, the admin panel is the home for a private and secure email experience.
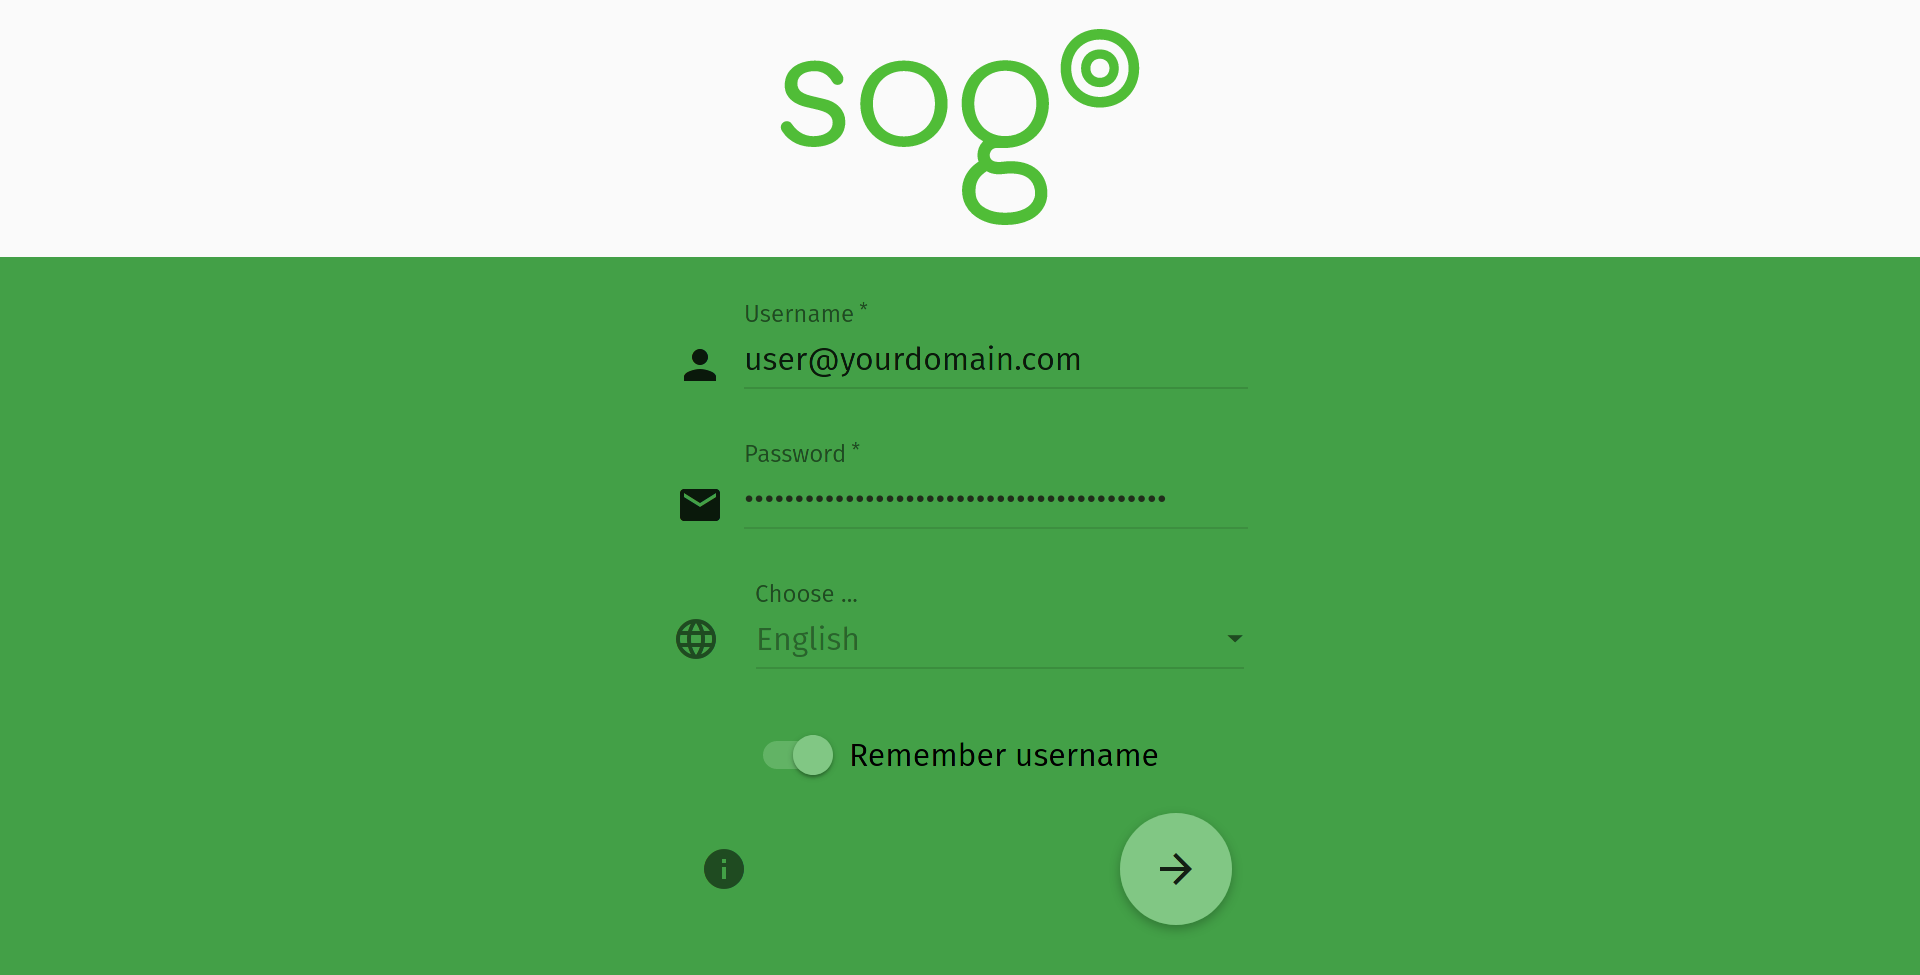
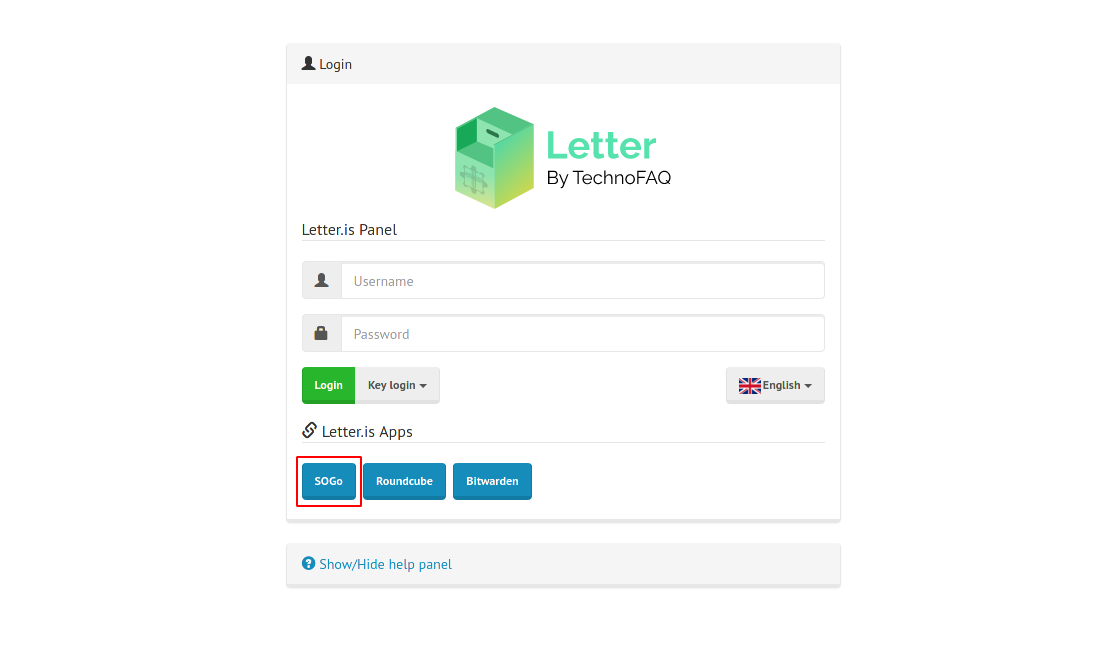
Letter.is panel login
The homepage for Letter.is Email is “https://mail.letter.is”. You can bookmark it on your browser to access quickly. After you visit “https://mail.letter.is”, it will present you with a nice and friendly login prompt.
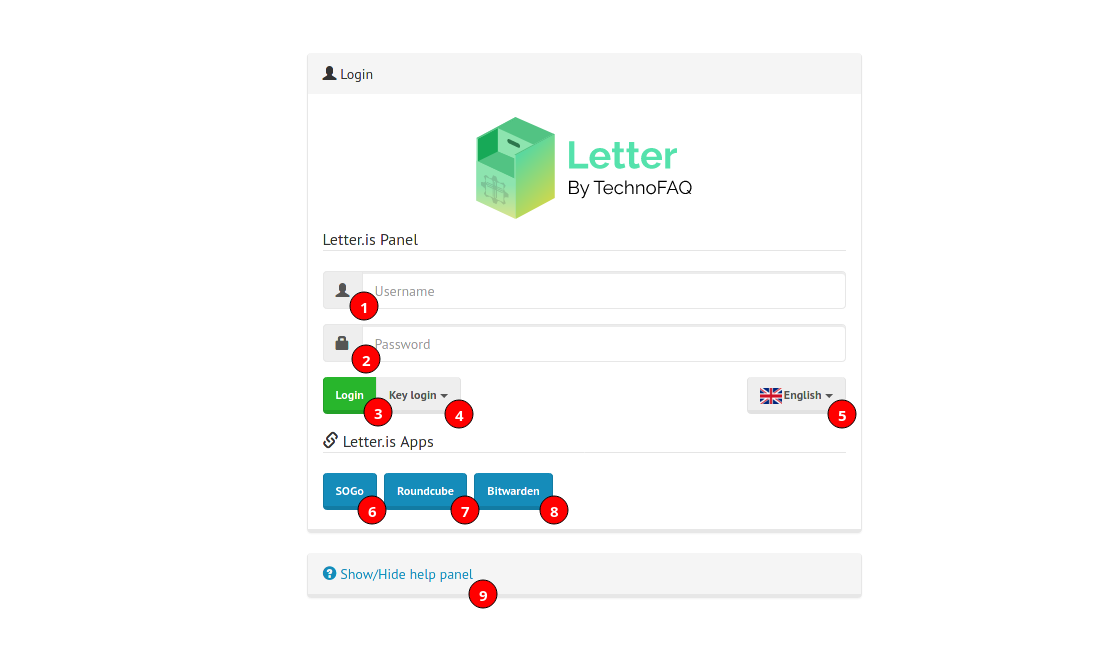
Letter.is will ask your username and password for logging in. After successfully entering the correct credential, you can use all of your email functionality. Let’s discuss what each option for the login prompt means.
- This is where you will enter your username. Remember that if you want to create users, add domain names (e.g. yourcompanyname.com), you can do so by entering your domain administrator’s username. If you enter your username for domain administration, it will log you in as admin. If you are a user of your organization or group, you can login with your email address (e.g. user1@yourcompanyname.com) to login the user panel.
- This where you will enter your password for username. Each user has their own password. It is a good practice to use a strong password for your Letter.is user.
- Clicking this will log you in to admin or user panel
- If you want to use your fingerprint or FIDO2/WebAuthn supported key to login to your account without entering the password, you can do so by clicking this button and selecting FIDO2/WebAuthn. Remember to enter your email and password, click FIDO2/WebAuthn, then enter your key or scan your fingerprint if you are using it for the first time. After registering your key, you don’t have to enter username and password again when using your key.
- Select your language from here. Currently Letter.is supporting 19 languages, more coming soon.
- Click here to login to your SoGo webmail. This is where you will access your emails, calendars, tasks and events.
- This button will allow you to login to RoundCube webmail client. We will discuss the difference between these two webmail clients later.
- This is where you can access Bitwarden, our choice for the best password manager. You can access, add, remove and manage your Bitwarden vault from this option. We will discuss all the functionality and descriptions for Bitwarden later in the documentation.
- Clicking this will open a help panel with short descriptions of above fields and options.
This is all you need to know about Letter.is login. Log in to your account from “https://mail.letter.is” and start managing your account now.
Admin panel and user panel
After successfully logging in to your admin or user panel, you will be able to manage your mailbox, users and user settings. An administrator has the highest privilege and can add and manage domains, mailboxes or users and more. You can use your username (i.e companyadmin) to login to your admin panel and manage domains and mailboxes. To login to your user (mailbox user) account, you have to enter your email address and password. With your mailbox user account, you can manage your mailbox, download configurations, generate temporary email aliases, adjust spam filters, manage sync jobs, manage app passwords and more.
Admin panel
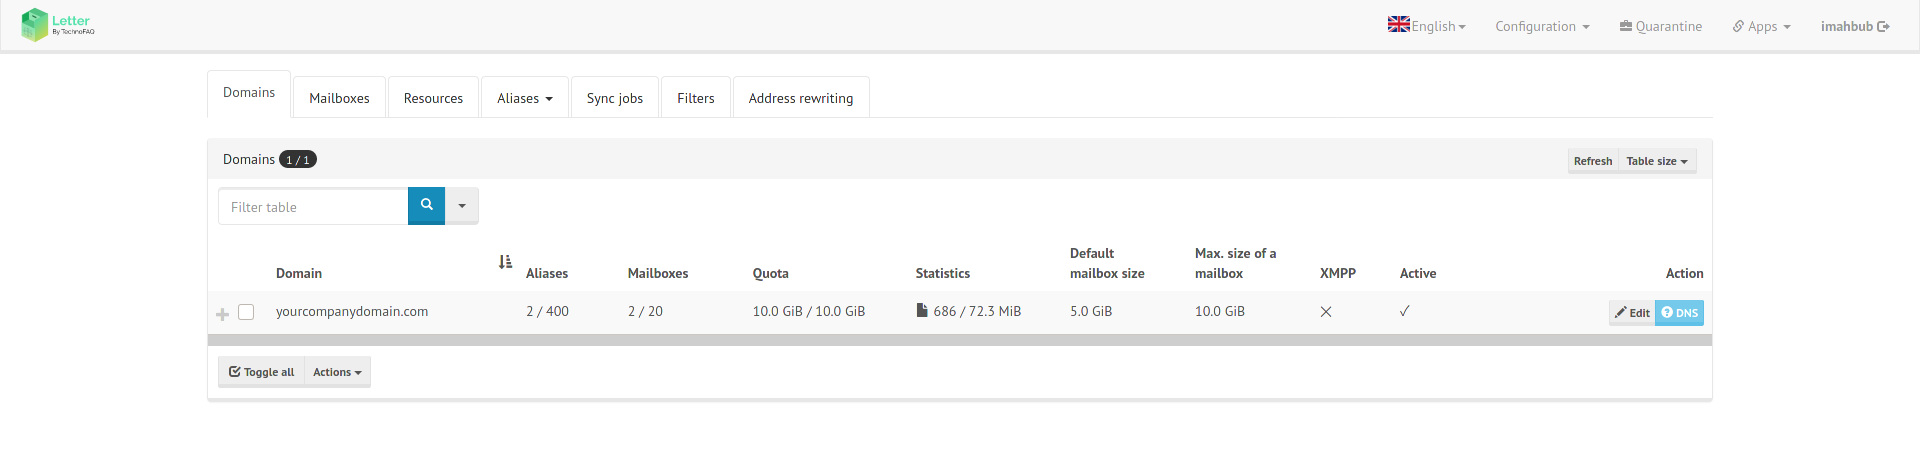
This where you will administrate your organization mailboxes or users.
Adding domains
Please ask support for adding domains.
Adding mailboxes
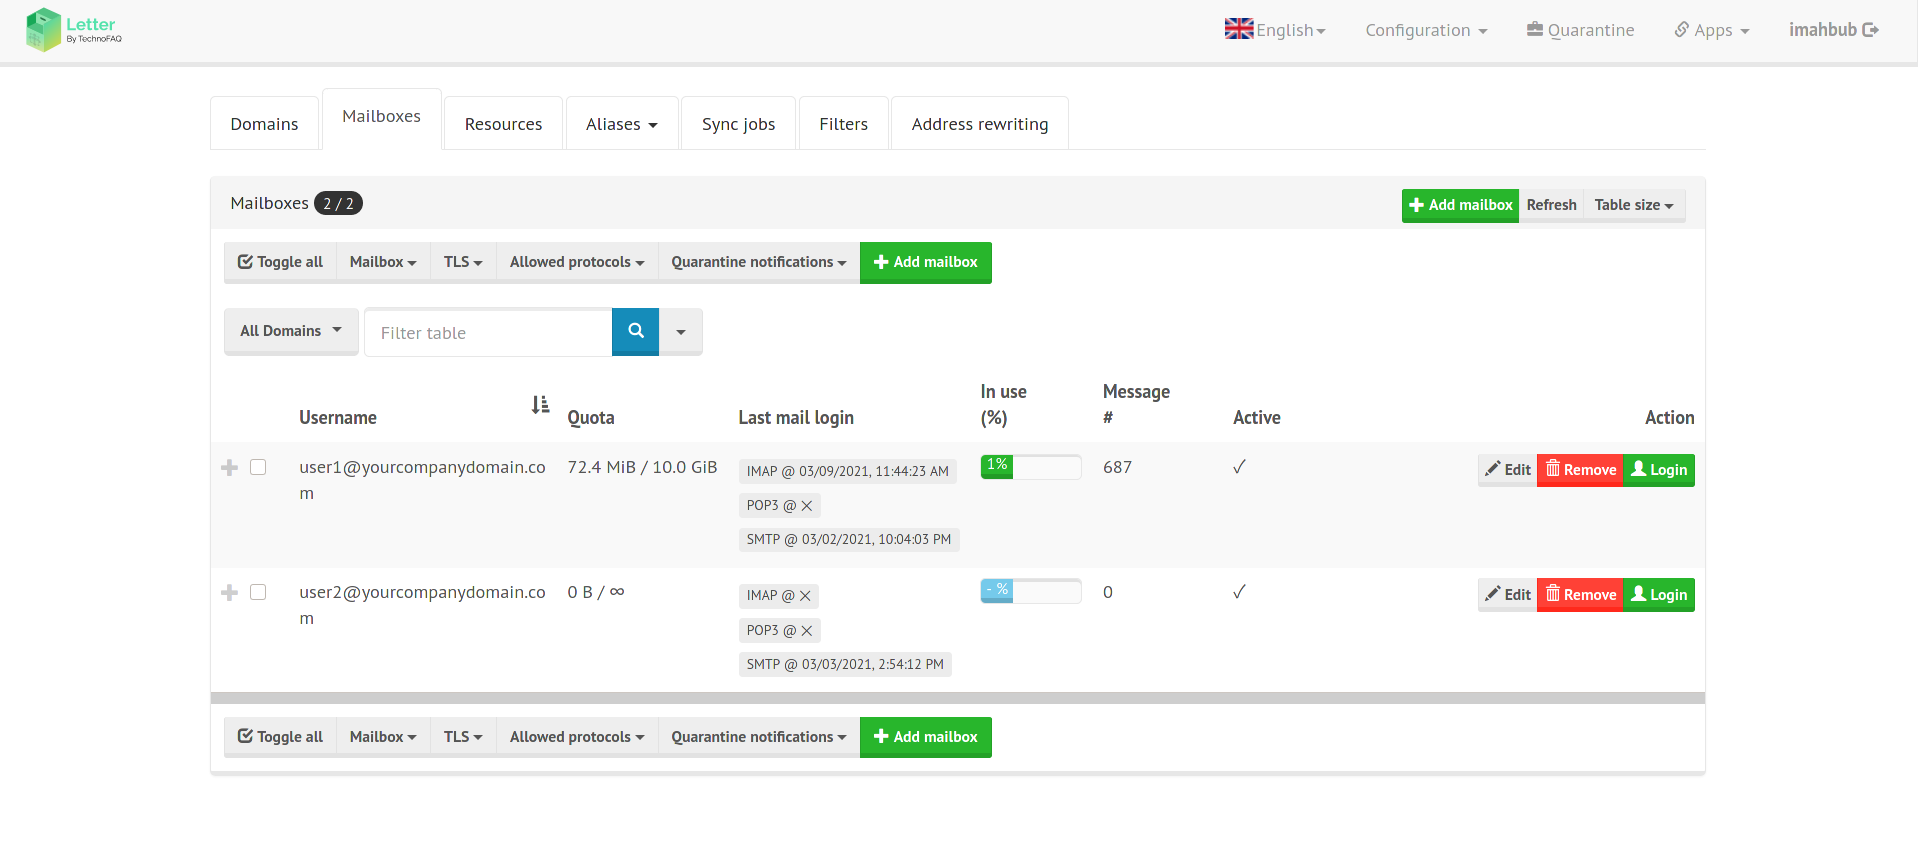
You can add users or mailboxes for your organization or team Mailbox tab. To create mailboxes:
- Head to Mailbox tab
- Click the “Add mailbox” button
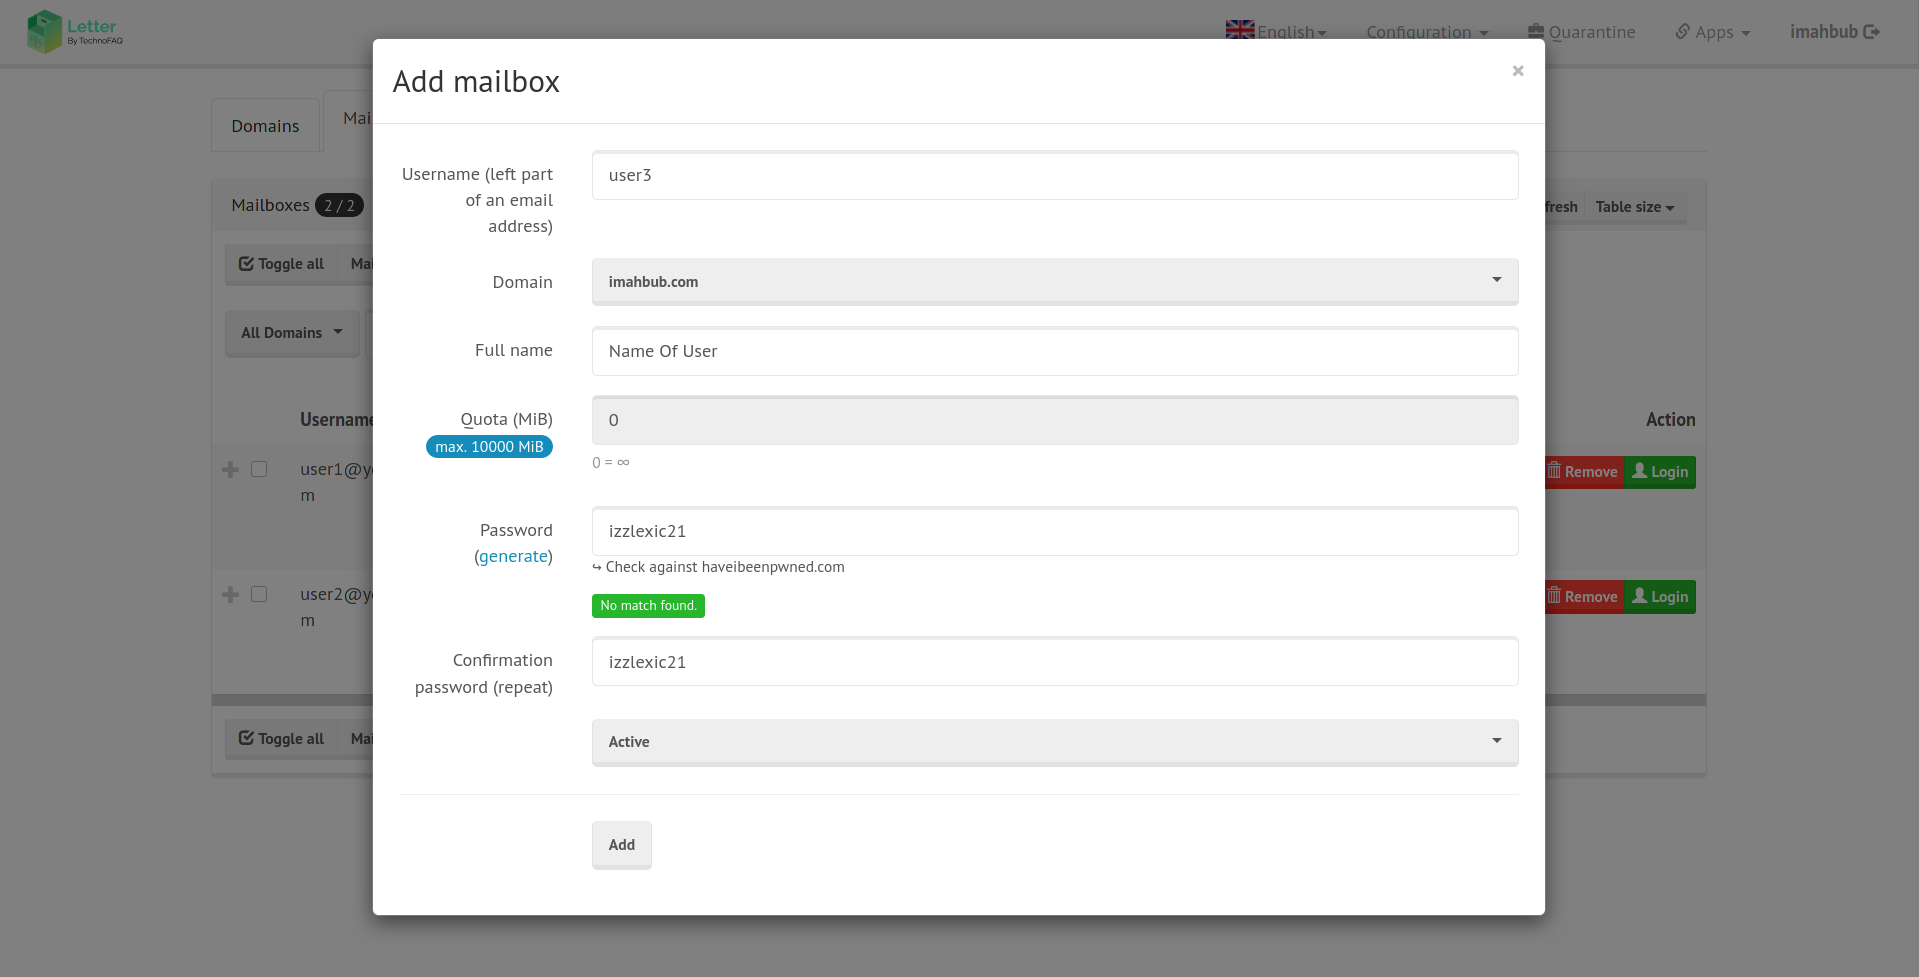
You will be presented with a prompt where you can add mailboxes.
- Enter a username (if you enter “user” as username, your address will be “user@yourcompanydomain.com”).
- Select the domain you want to assign this mailbox to.
- Specify quota in MiB (1000 MiB = 1 GiB). This gives a limit of how much space a user can use for the mailbox.
- In the password section, enter a secure password you want to use for signing in. You can generate a secure password automatically by clicking “generate”. You can also check if the password has been previously breached or not.
- Write your password again in the confirmation password field.
- Keep this dropdown option to “Active”.
- Finally, click “Add” to finish adding your mailbox.
After adding a mailbox successfully, you will see new mailboxes in the mailboxes list. You can then edit, remove and login to mailboxes in the list.
Adding resources
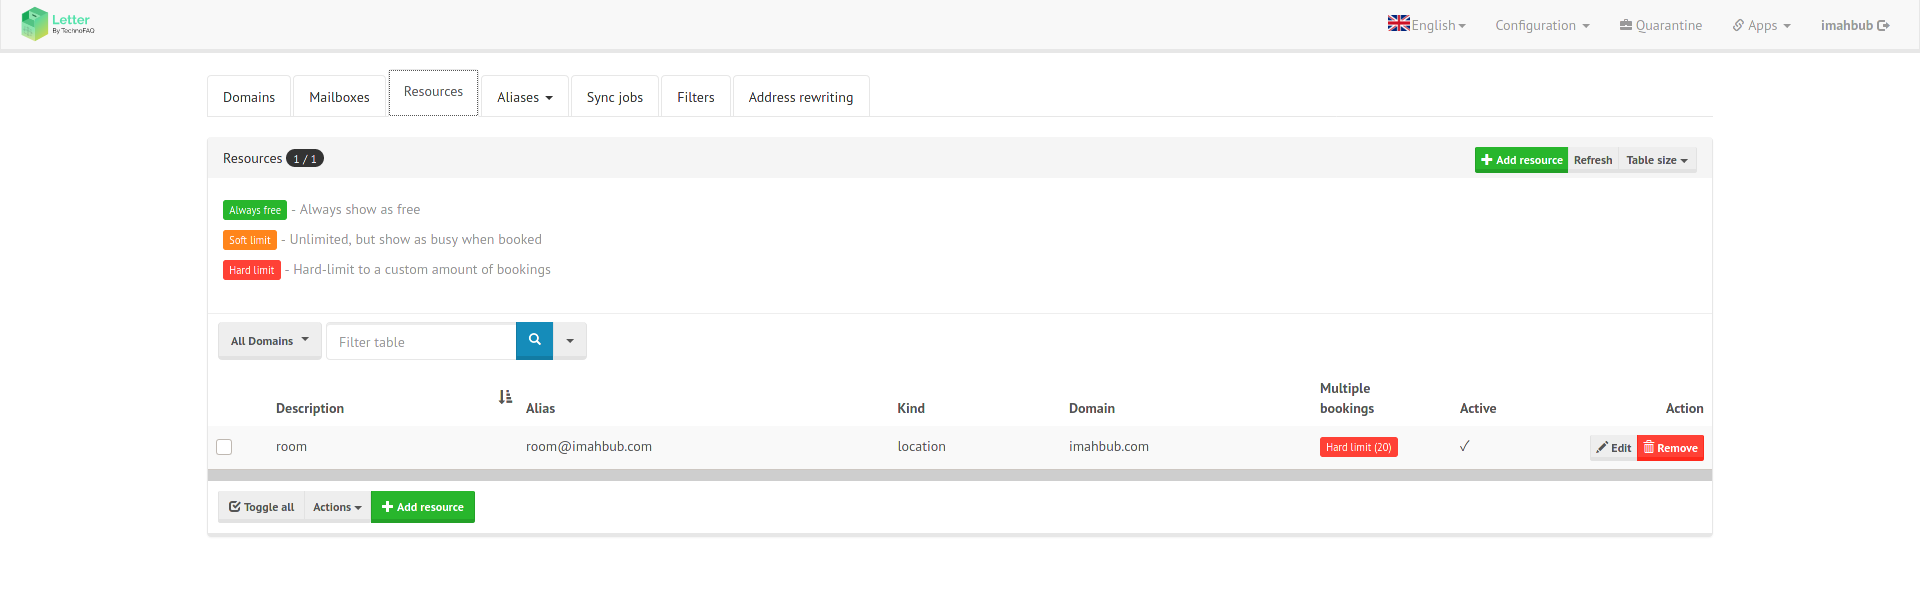
It’s now possible to tell SOGo how to identify resources (conference rooms, projectors, etc.) and apply constraints on them to avoid double-bookings and to automatically accept the “invitation” for them. Resources really are just users. The paradigm in SOGo is to create a
special user for each resource and let the person in charge of that resource know the password so that he/she can accept or deny events. If many people are supposed to administrate the resource, you can allow them to add or modify events, per type of event, on the resource’s calendar. Whenever a regular user needs that resource, he/she only needs to invite it.
To add resources:
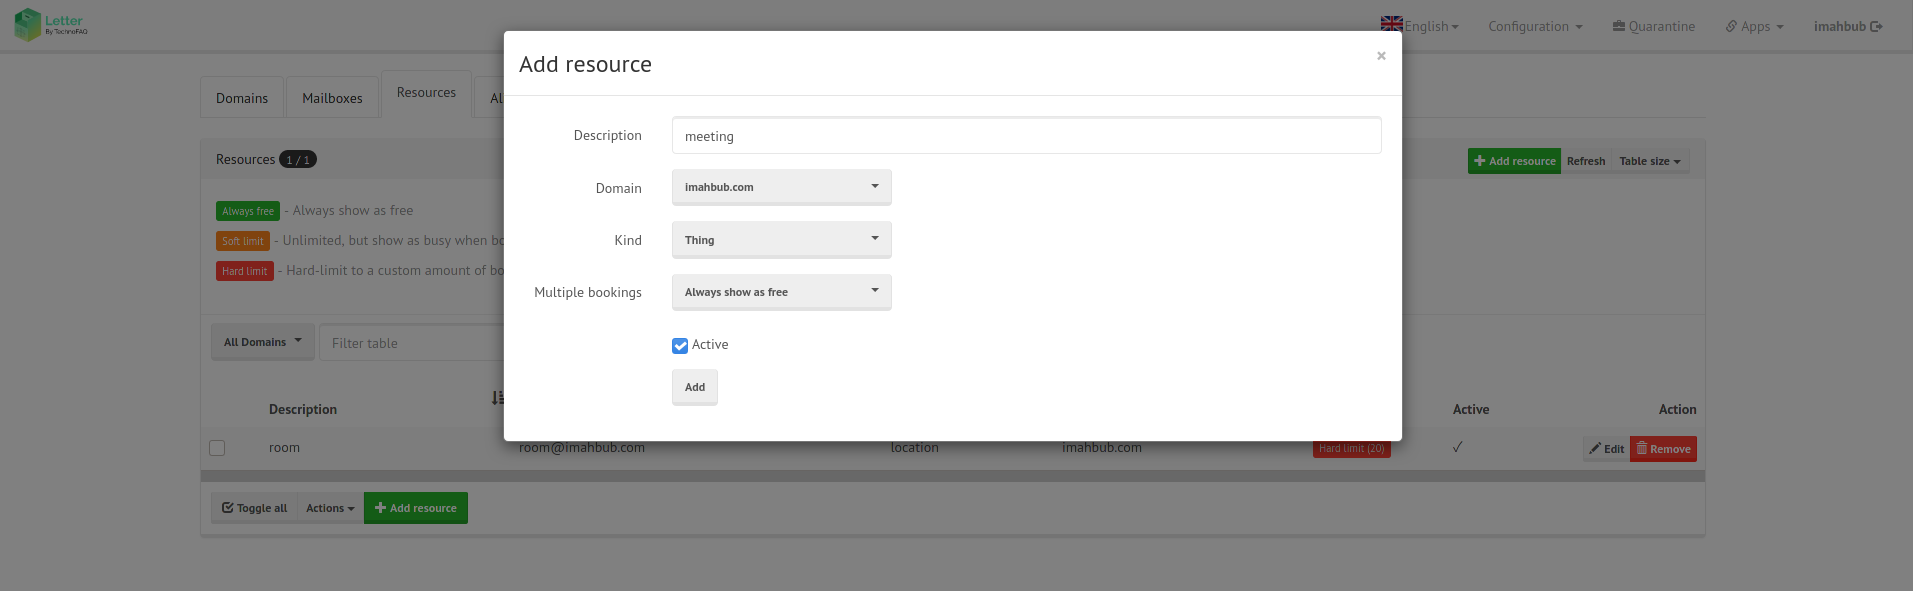
- In the description field, write a short name of the resource you want to create. (i.e room, meeting, projector)
- Select the domain you want your resources to be assigned to.
- Select the kind of resource it is. Location is for locations such as room, hall, etc. Groups are for groups and things are for things or objects i.e. Projector.
- In this dropdown option, you can specify the state of bookings. You can set a limited number of bookings by selecting “Hard limit to a custom amount of bookings” and set a number i.e. 20.
- Keep the box checked to make the resource active.
- Click the “Add” button to finish adding the resource.
Once added, you can edit or remove resources from the list.
Adding email aliases
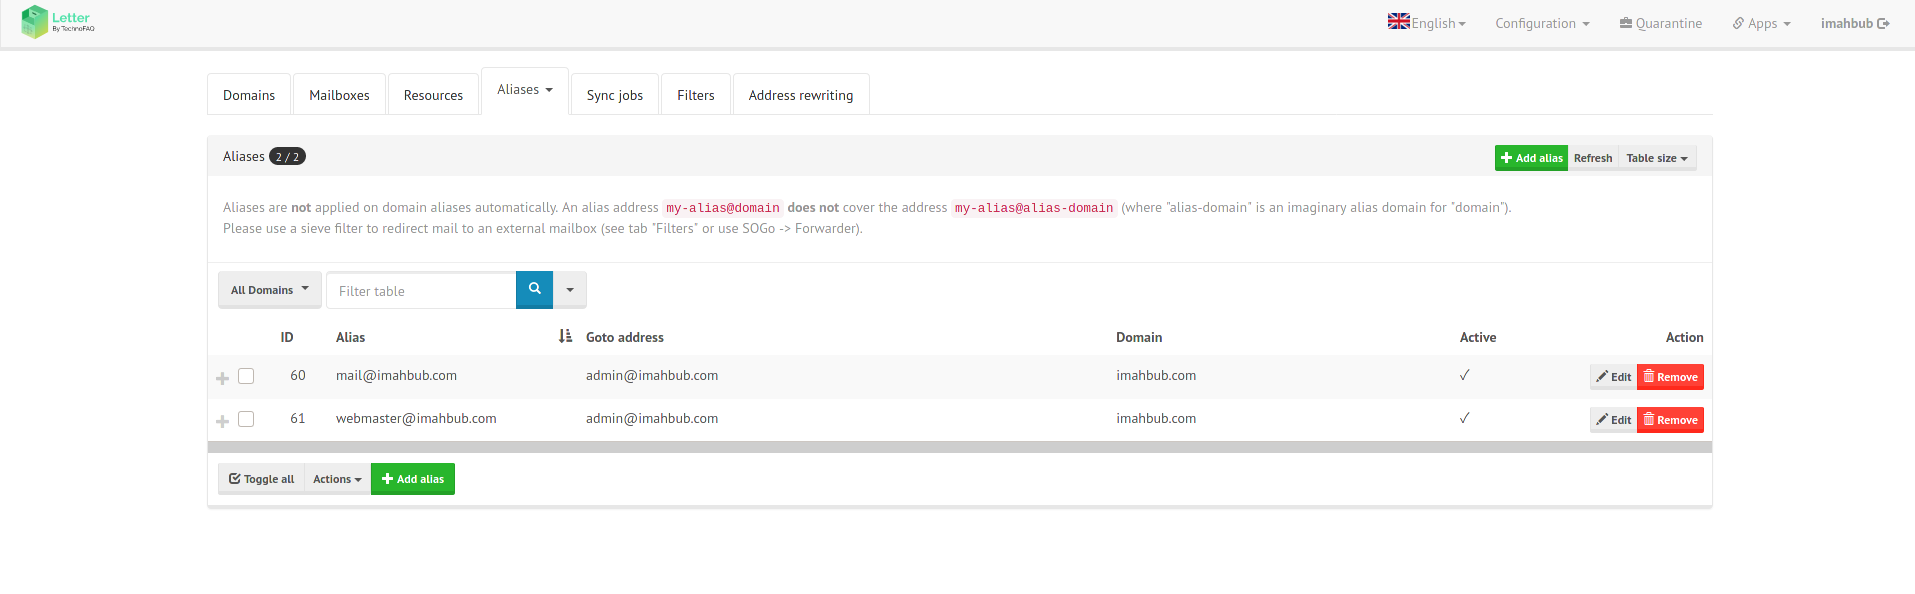
Email aliases redirects mails sent to alias addresses to specific destinations. This is very handy when you want to use one mailbox to receive email from different alias addresses. For example, you have main@example.com as your primary mailbox. You want to create different addresses like info@example.com and webmaster@example.com for the same domain, but do not want to create separate mailboxes or users. So, you add info@example.com and webmaster@example.com as aliases and set main@example.com as destination. Now, if someone sends an email to info@example.com and webmaster@example.com, it will land on main@example.com’s inbox.
Keep in mind that only domains registered with letter.is will work for this feature. If you want to use similar features for external addresses, please check this tutorial.
To add email aliases:
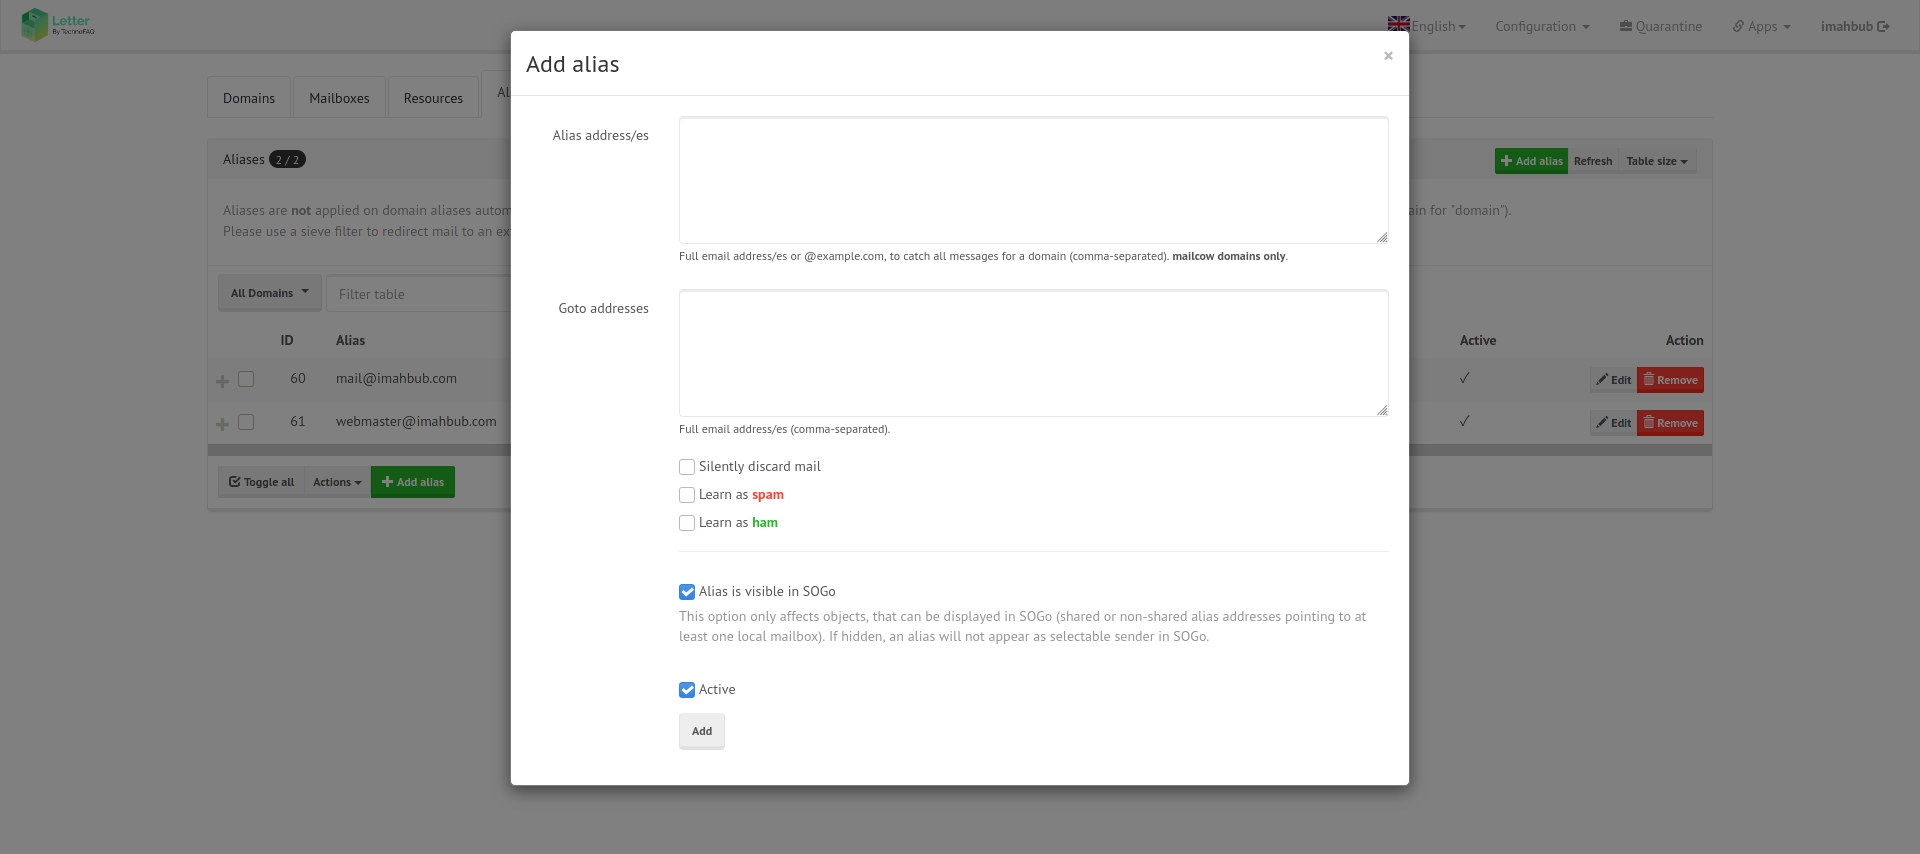
- Head over to Aliases tab
- Click “Add alias”
- On the “Alias addresses” field, enter your desired alias email addresses. The format should be like “aliasname@domainname.com”. Use commas to separate alias addresses. An example is : “info@example.com, webmaster@example.com”
- “Go to address” is where you will enter your destination address. Emails sent to alias addresses will be landed on the email address specified in this field.
- You can silently discard mail, allow your spam detector to learn incoming mails as spam or ham (safe or not spam). Here is a short description of what each options does:
- Silently discard mail : Will automatically discard or stop mails from landing on your inbox
- Learn as spam : Will mark any incoming email as spam and your spam detector will learn similar messages as spam and block them in the future
- Learn as ham : Will mark any incoming email as ham or safe. This is the opposite of what “Learn as spam” does.
- Put a checkmark on “Alias is visible in SoGo” if you want to make the alias visible to SoGo. This option only affects objects that can be displayed in SOGo (shared or non-shared alias addresses pointing to at least one local mailbox). If hidden, an alias will not appear as a selectable sender in SOGo.
- Keep the checkmark on “Active” to keep this option active and working.
- Finally, click “Add” to finish adding your mailbox.
You can check which aliases you have created in the list. Click edit to edit an alias and remove to delete it.
Advance
User panel
User panel is home to your tools and functionality for your email address. An organization may set up a mailbox/user account for you. You will login to your user panel with your email address. After successfully logging in, you can manage your mailbox, create temporary aliases, adjust and configure spam filters, import mails using sync jobs, set app passwords and more. There are tons of things you can adjust to make your email experience better.
Accessing your emails

You can access your emails in lots of ways. By default, we have support for web, desktop and mobile email clients.
Accessing emails on your phone
Access emails on your mobile without a complicated setup. Letter.is supports ActiveSync which enables you to login to your mailbox by entering only your email address and password.
Use Letter.is email using Bluemail app:
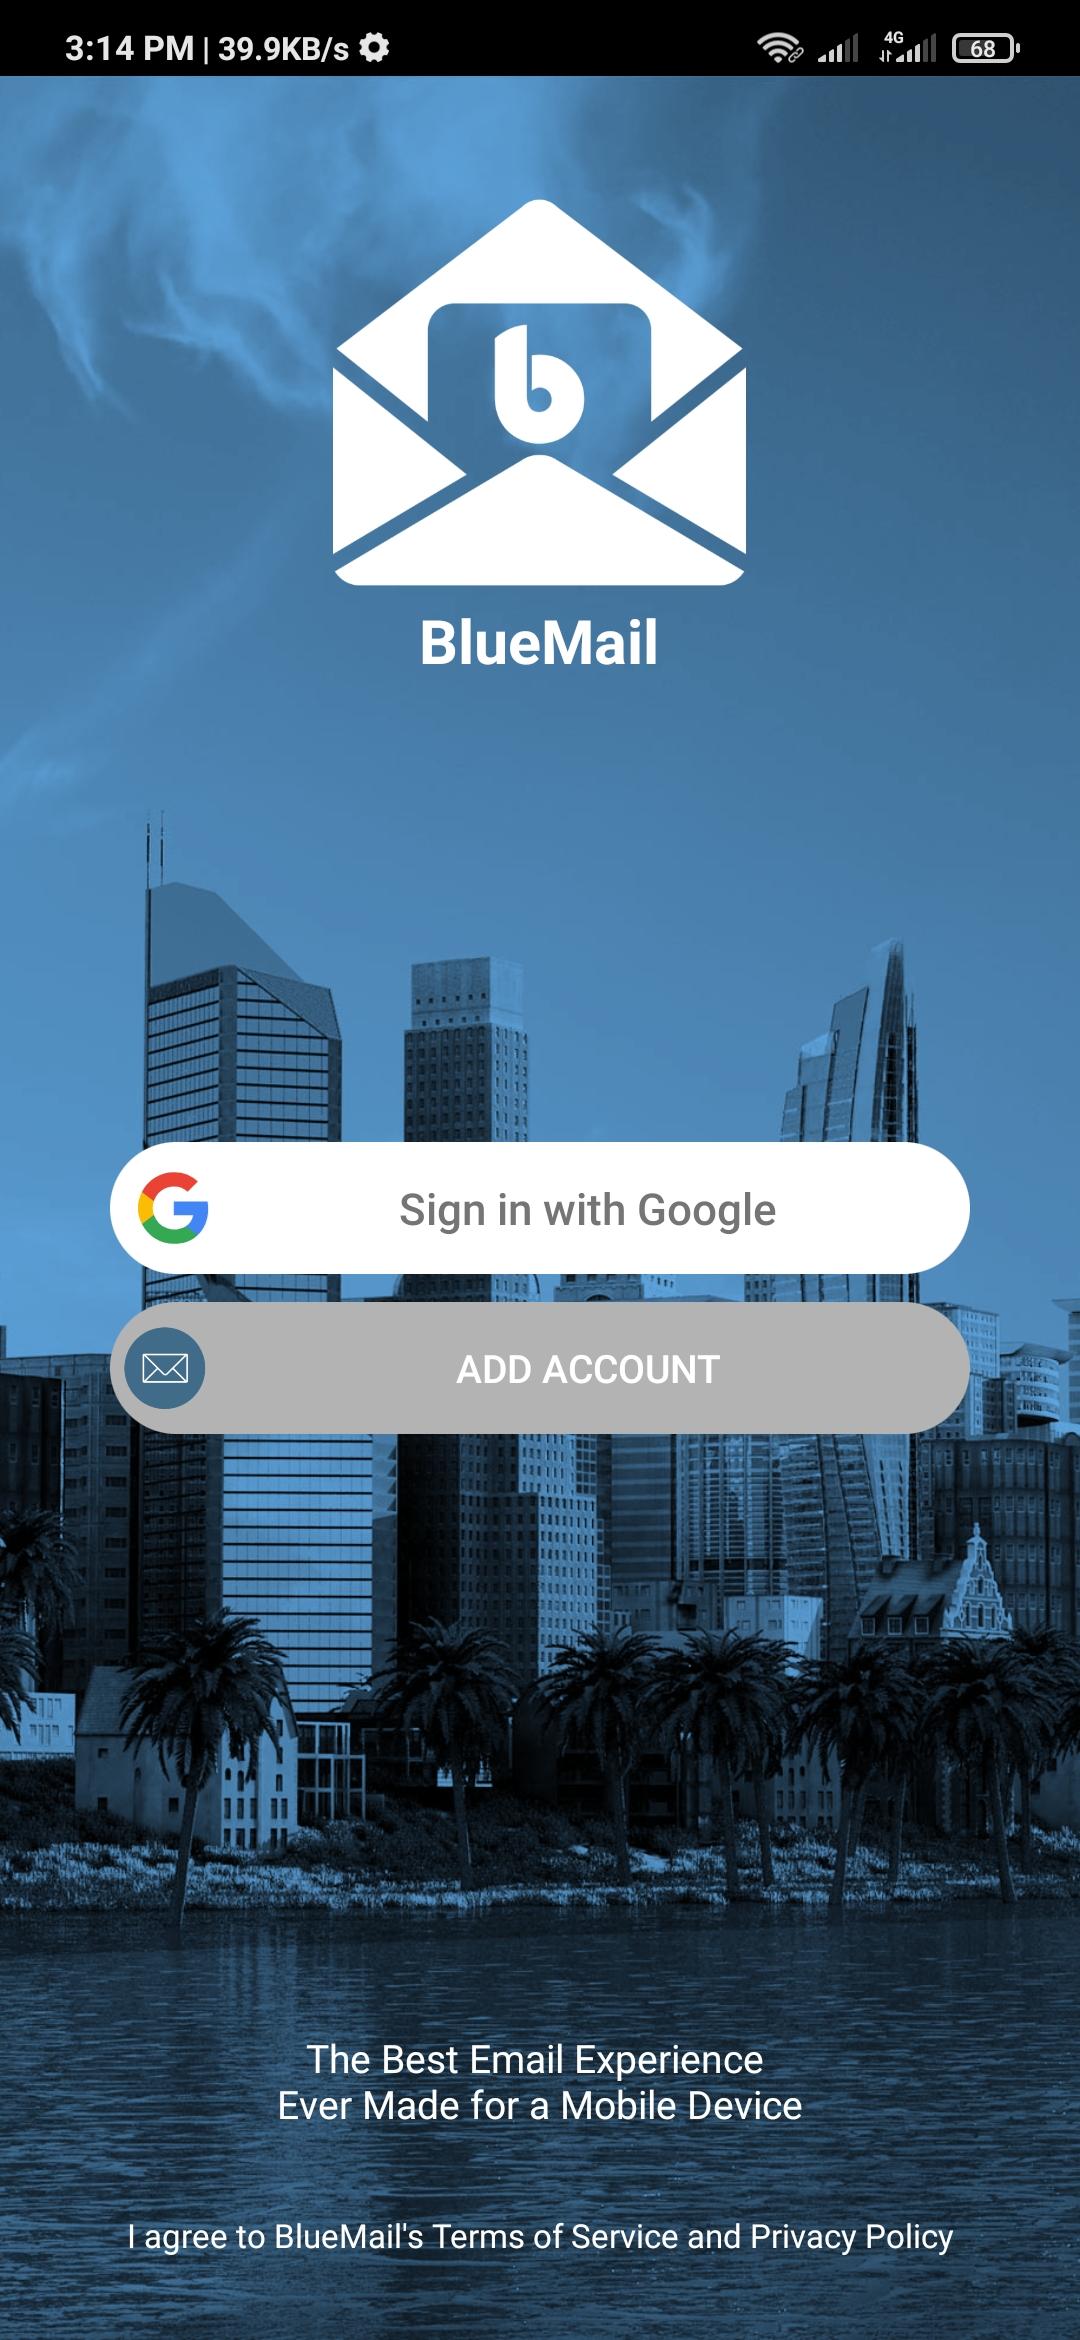
If you do not have Bluemail installed on your mobile device, install it from these links.
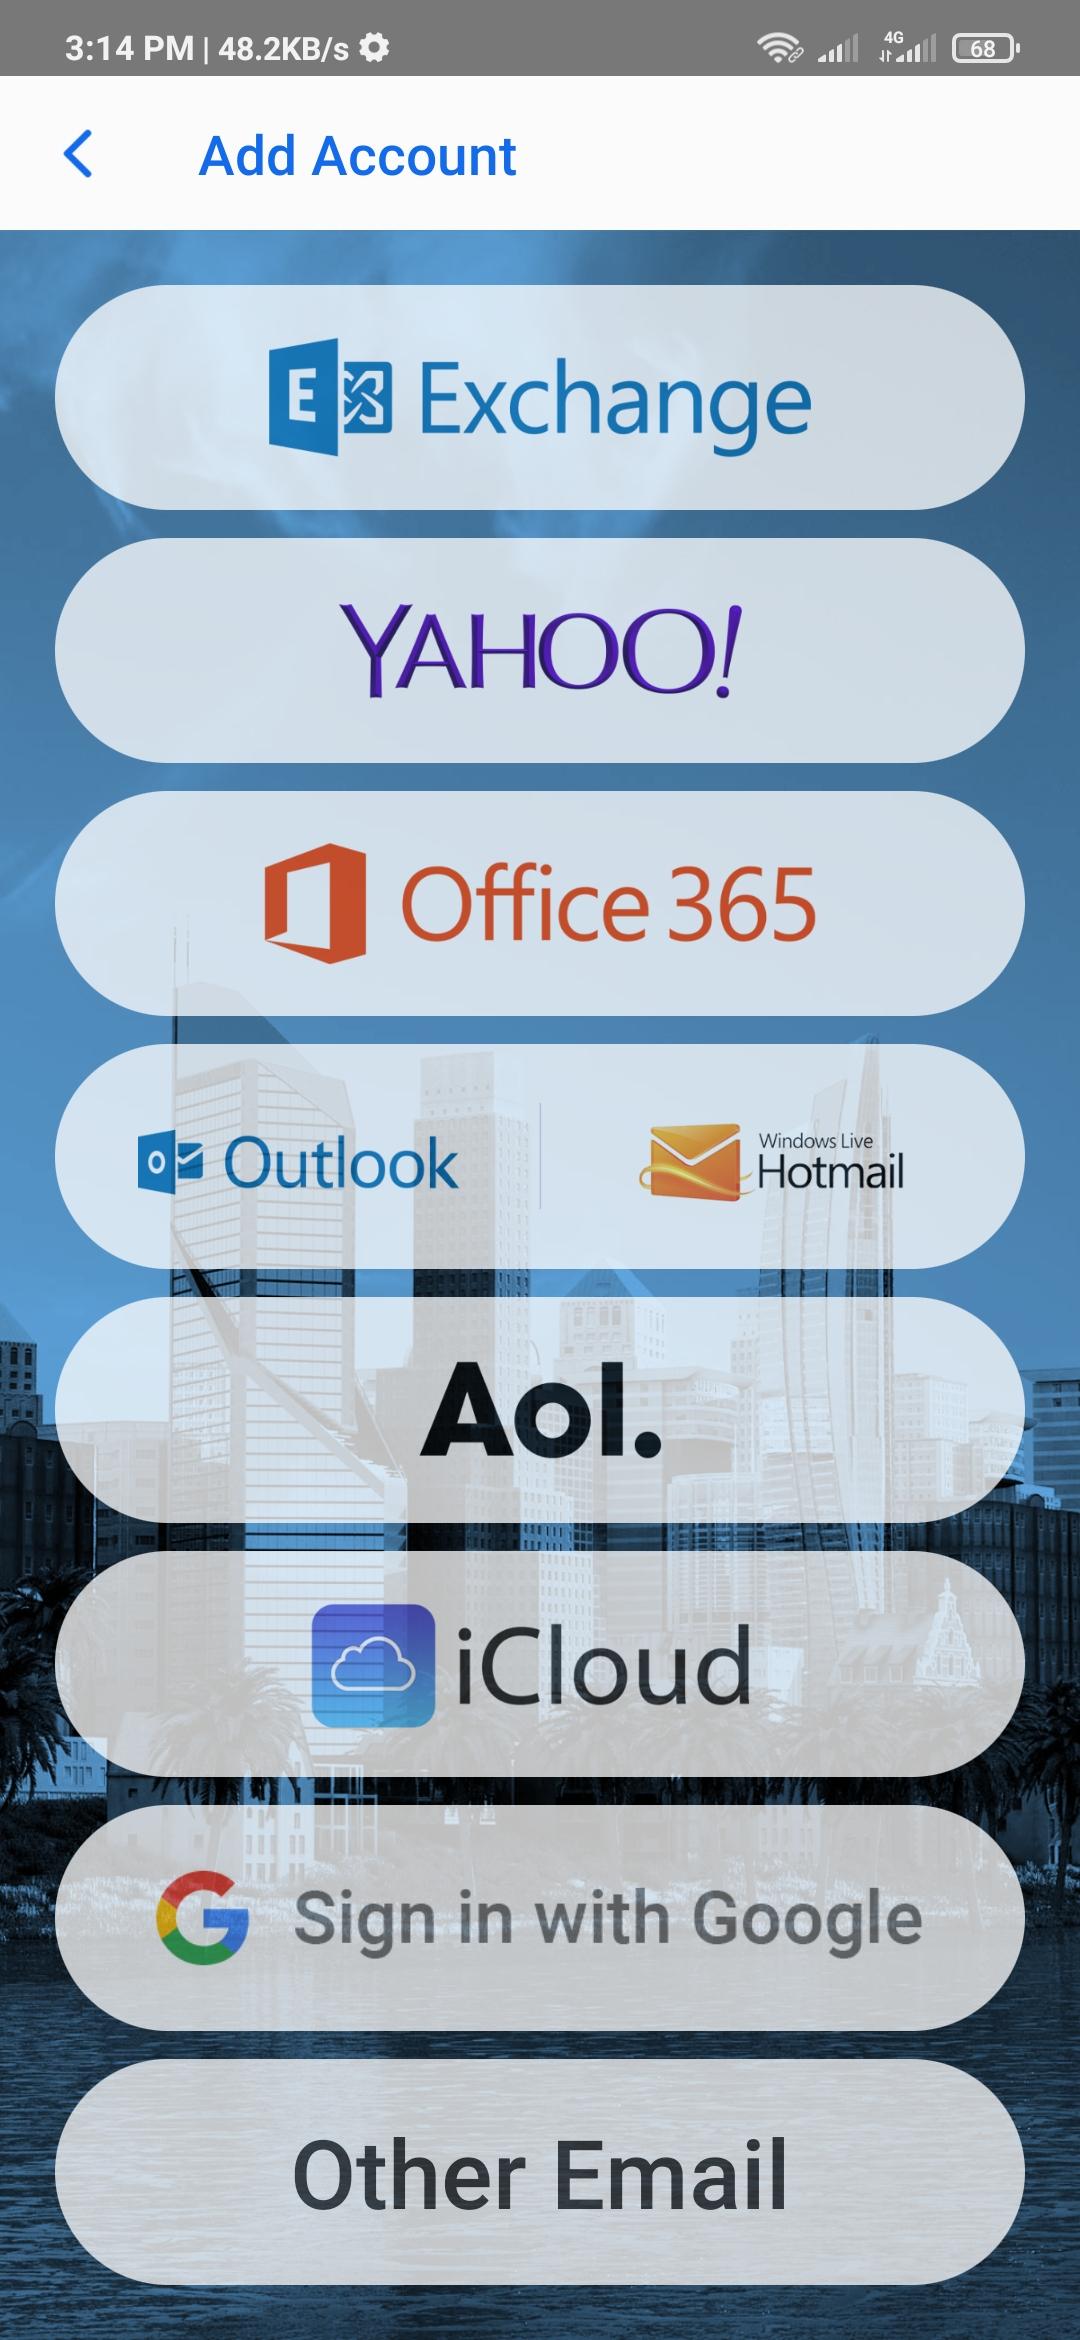
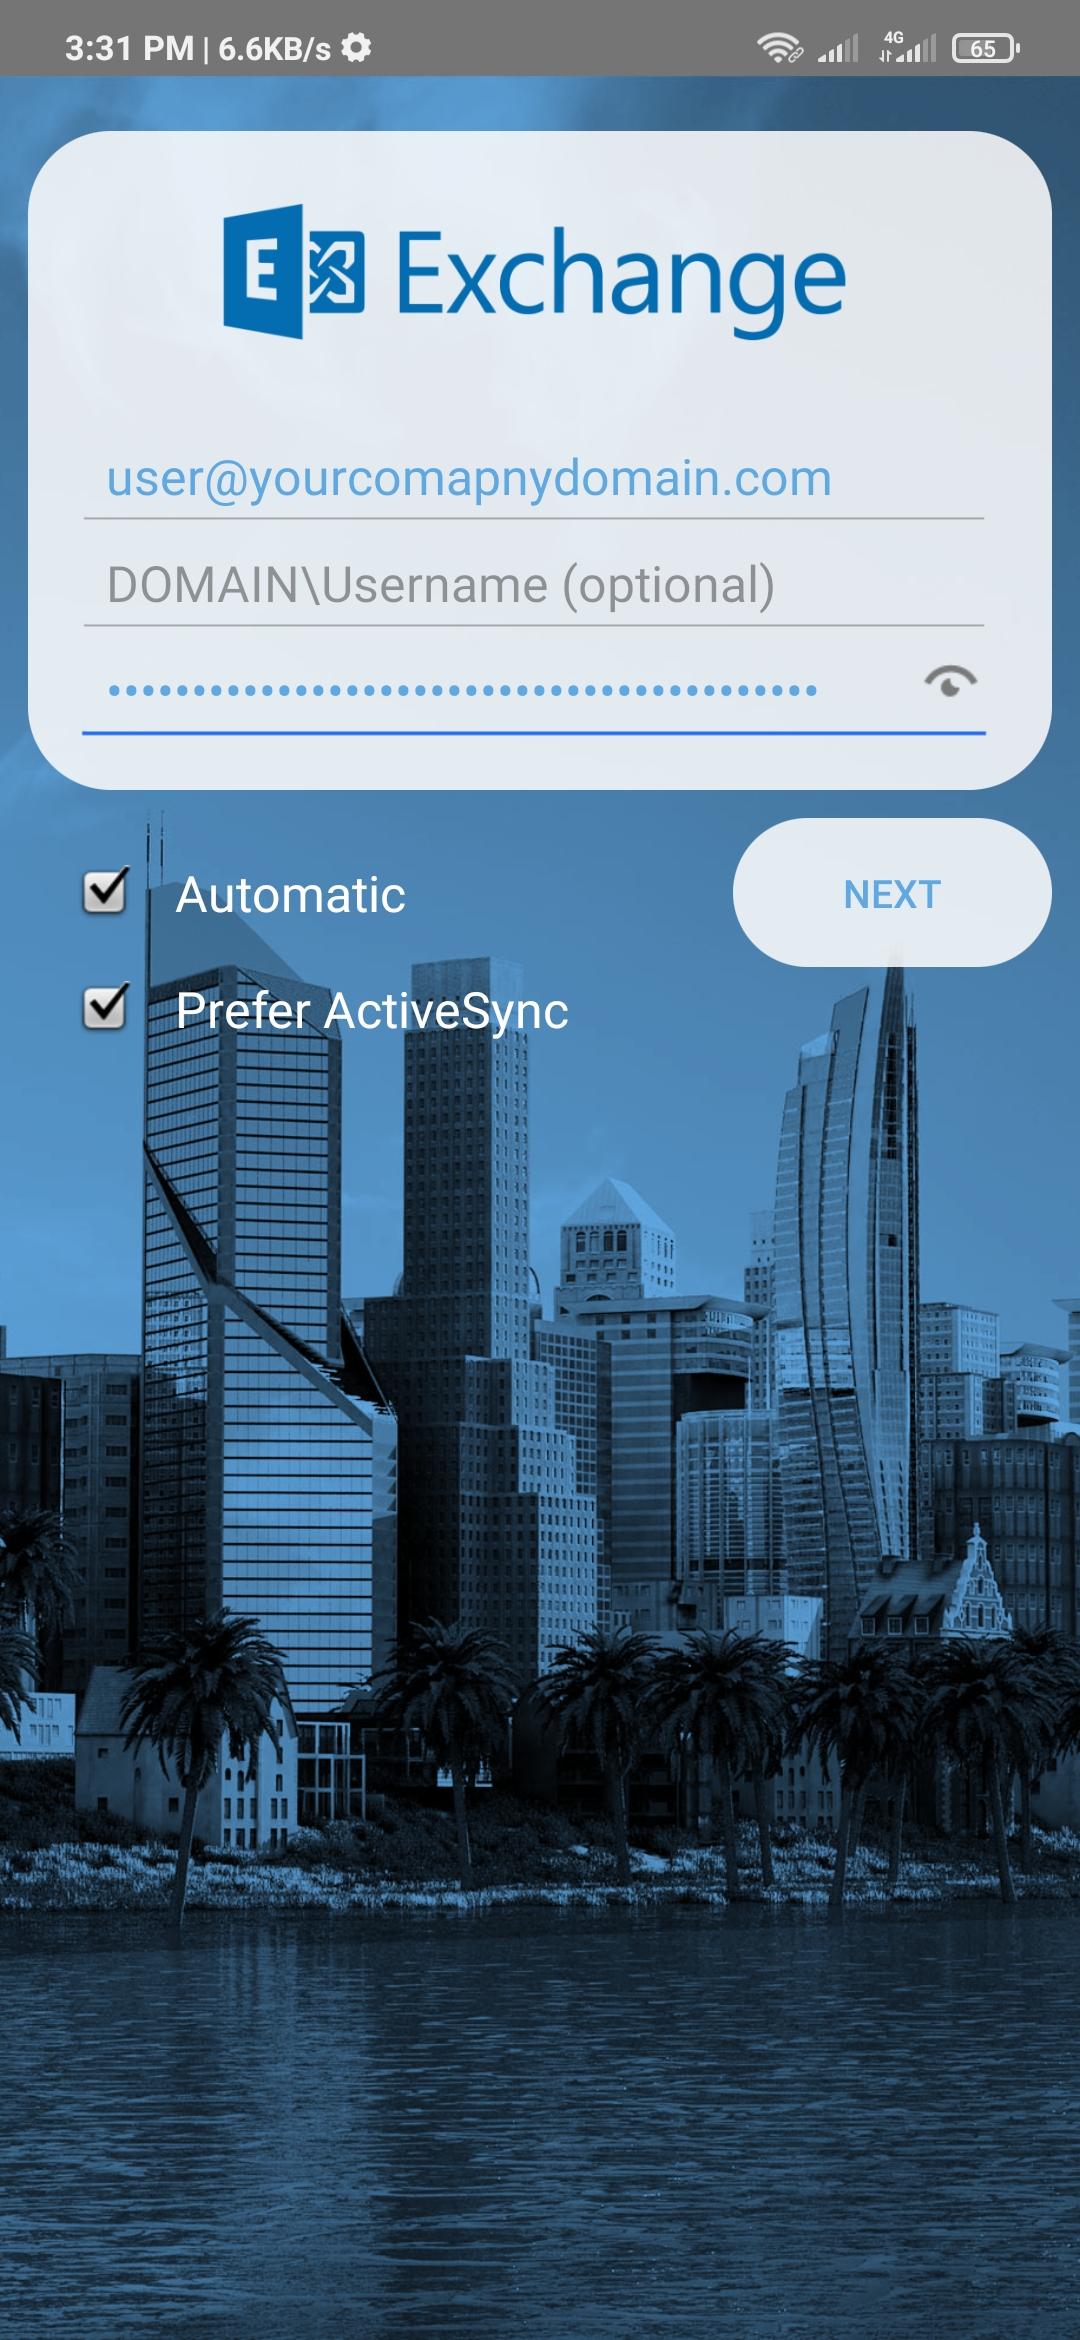
To login to your email mailbox, follow these three easy steps
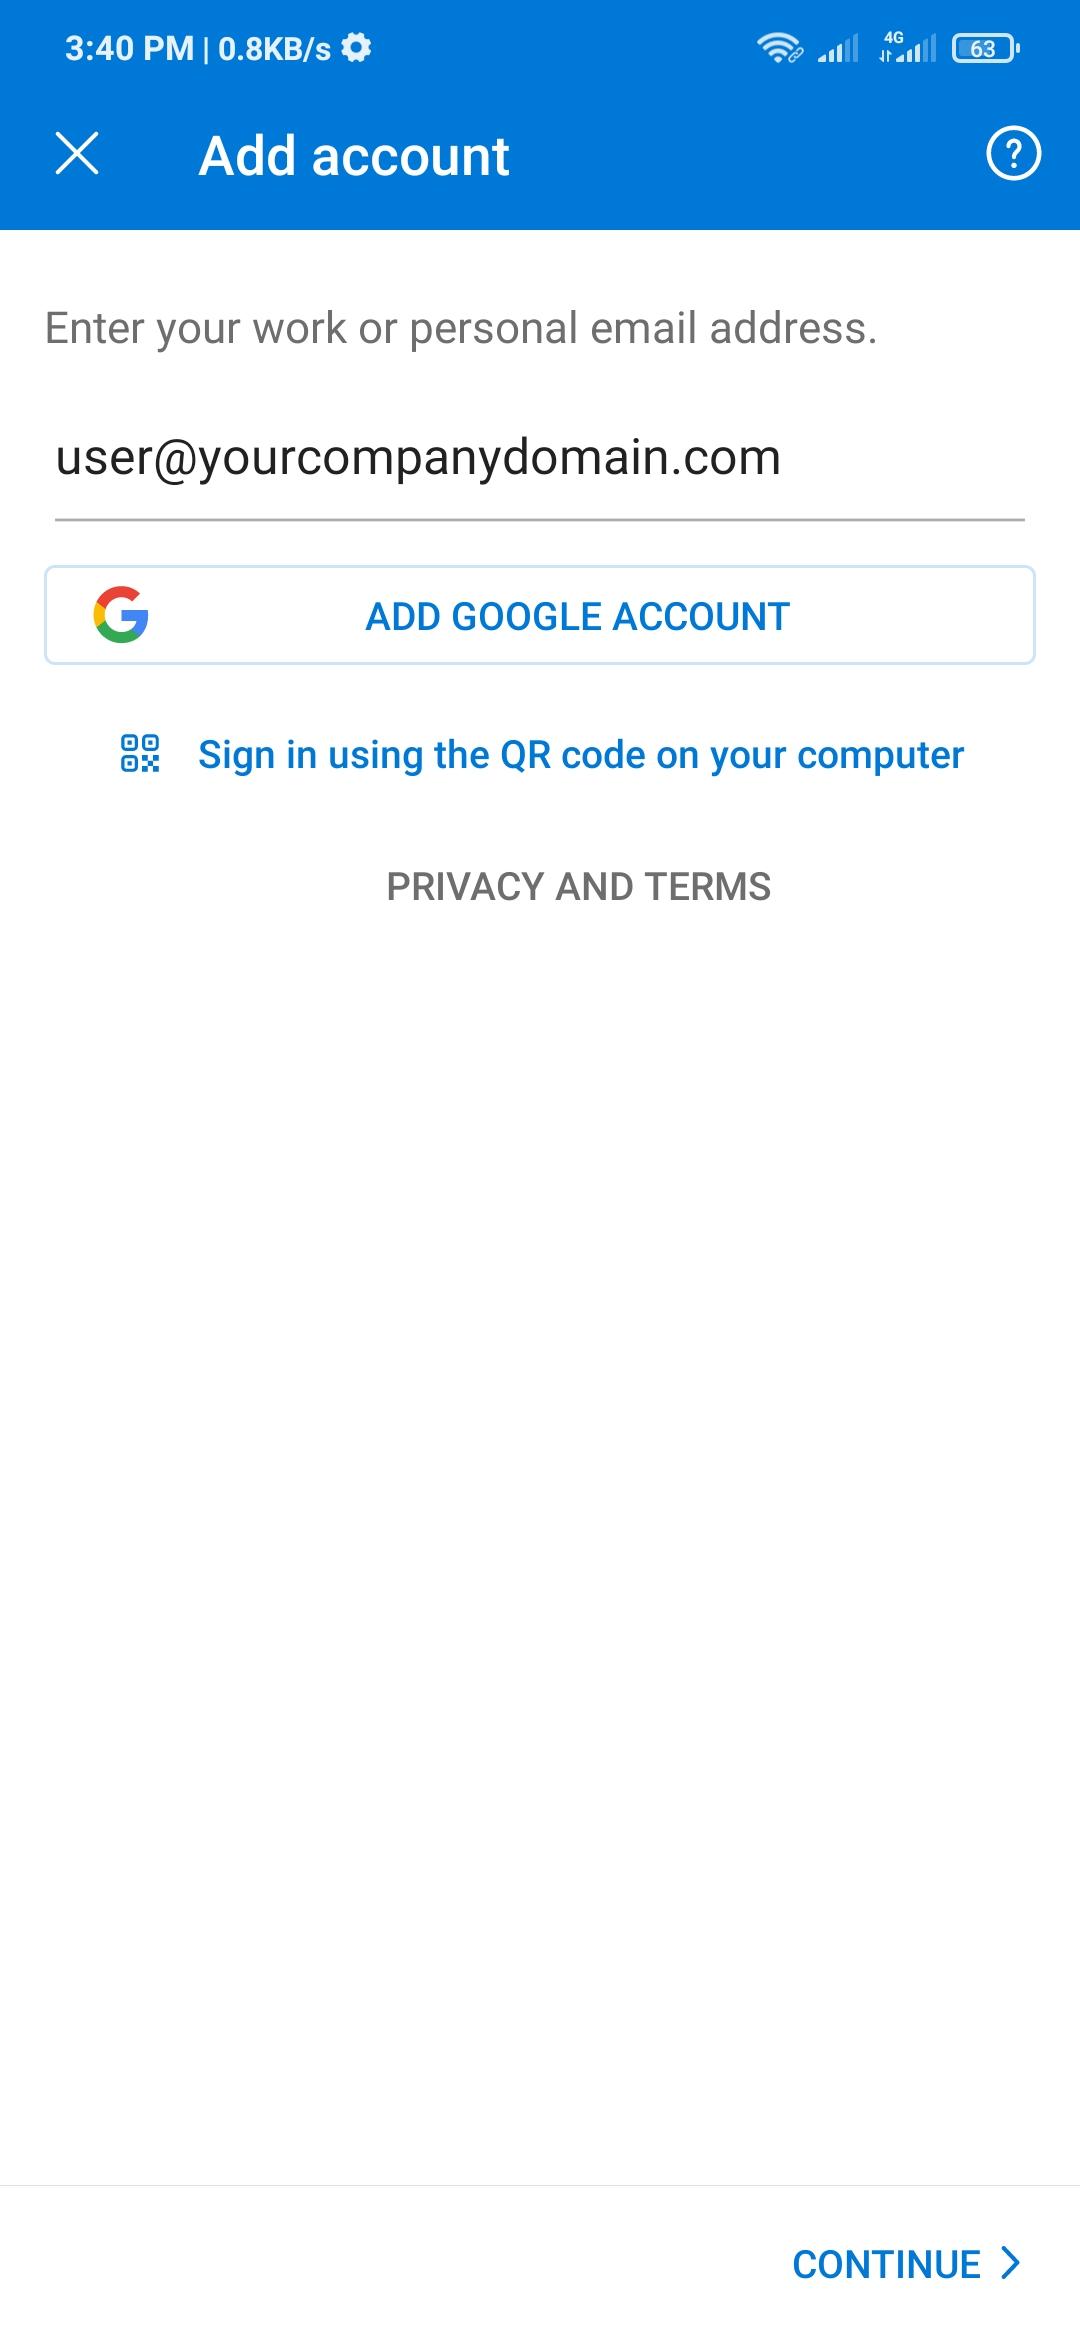
- Click “ADD ACCOUNT” from the sign on screen.
- Select “Exchange” as account type
- On the field “Email Address” write down your email address (i.e user@yourcompany domain.com). Keep the DOMAIN/Username field empty and write down your password on the “Password” field.
Keep the checkboxes as is and click “NEXT” to add your mailbox to your bluemail app. After successfully adding your account, you can send and receive emails and more.
Note: Using Exchange is the easiest way to access emails without any complicated setup procedure. We do have other ways of setting up your email client (standard IMAP setup, etc). We are also working on our own mobile app that is coming soon.
Use Letter.is email on your iPhone:
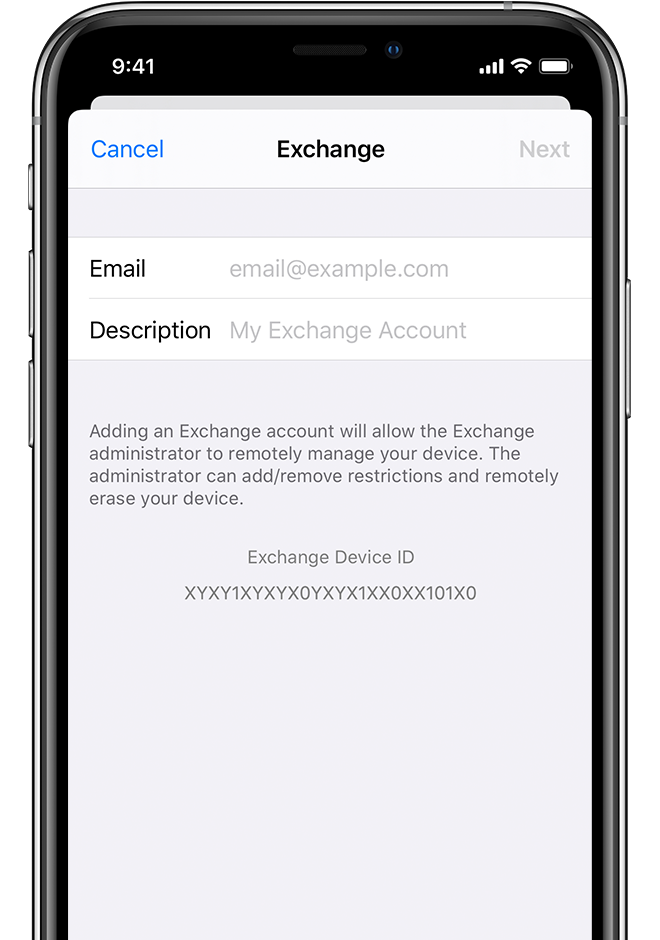
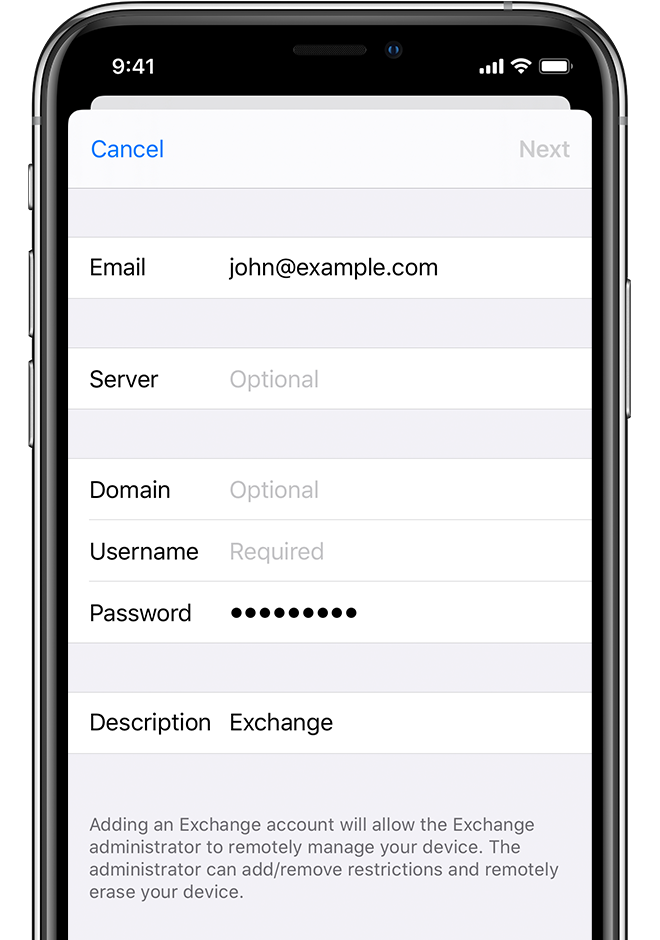
On iPhone, you can use your Mail app to use your Letter.is mailbox. This way, you do not need to install any third party application. To access Letter.is mailbox on your iPhone, follow these easy steps.
- Tap Settings > Mail > Add Account > Microsoft Exchange. If you’re adding another account, tap Accounts > Add Account.
- Enter your email address, then tap Next. You can also enter an account description.
- After you enter your email address, choose Sign In or Configure Manually.
- Tap Sign In to automatically discover your Exchange account information.
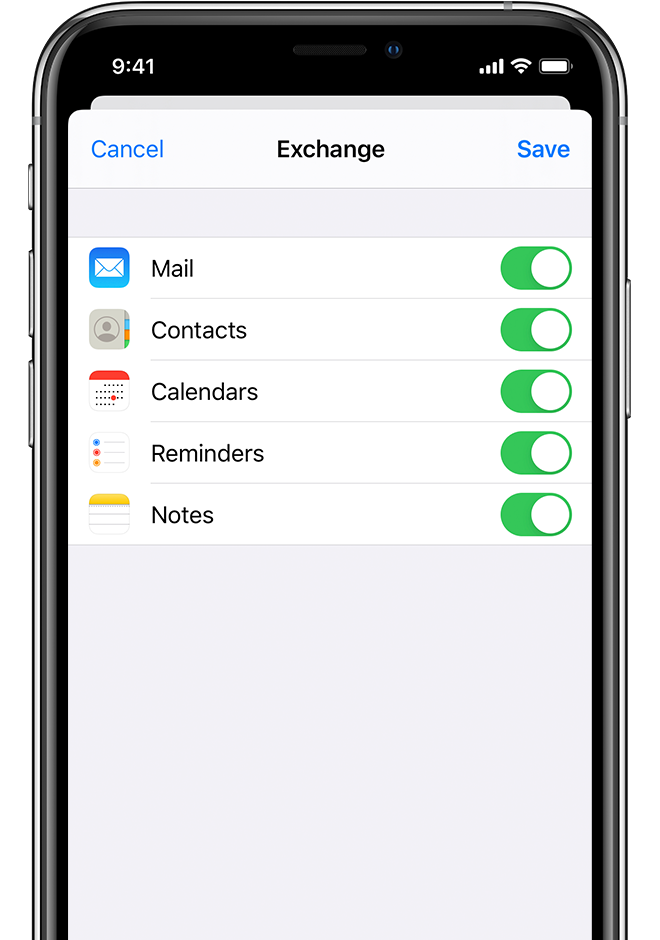
- If your Mail app cannot configure automatically, tap Manual Configuration. Then enter your email address, enter “mail.letter.is” as Server, leave the domain field empty, use your email address in the Username field, enter your email password in the Password field. You can set a description of this account (i.e. Work) or leave it empty.
- Keep everything as is and tap Save.
Now go to your Mail app and continue using Letter.is with your existing default email client for your iPhone and iPad.
Using mobileconfig to setup mail easily in iOS:
Letter.is provides another way for setting up a mail account, contacts and calendar via Mobileconfig. It installs your email, contacts and calendar configuration automatically in one click. To use this method, follow these easy steps.
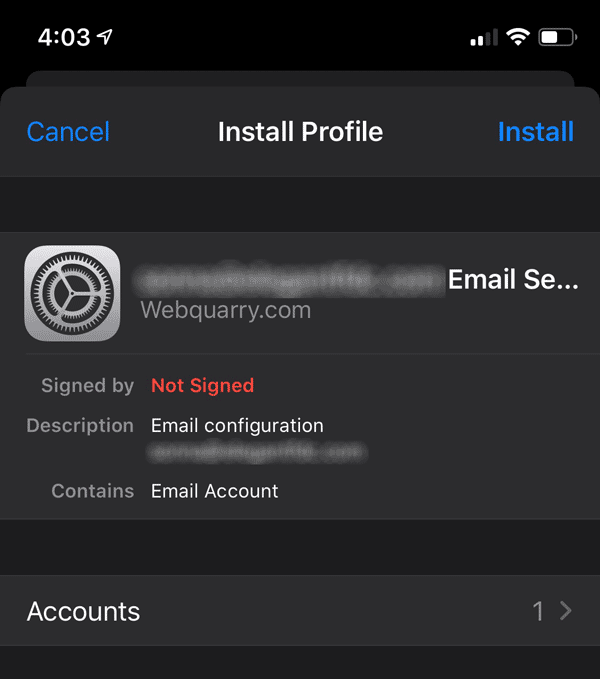
- Login to your Letter.is user panel using Safari browser on your ios mobile device
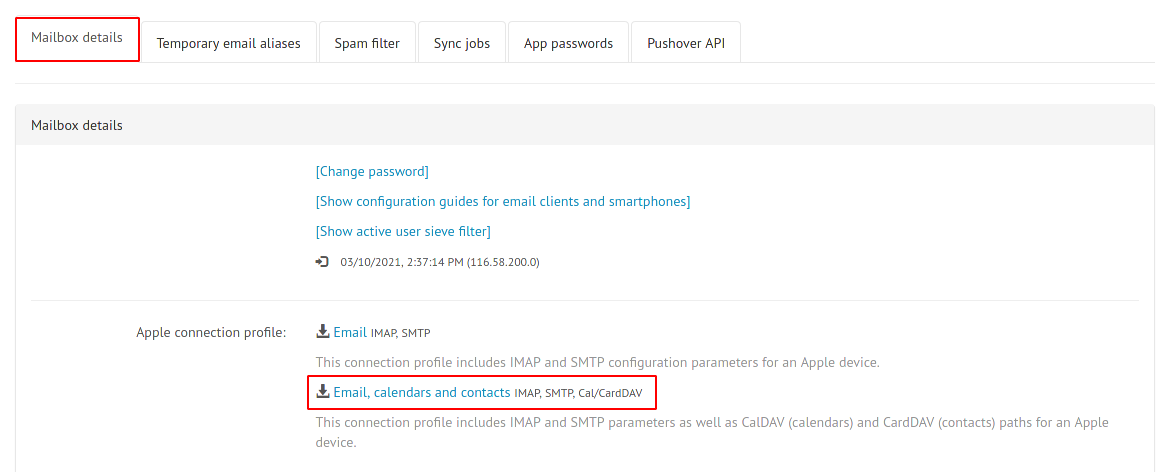
- Go to the Mailbox details tab and click on the “Email, calendars and contacts” link next to the download icon. This will download the configuration to your ios mobile device.
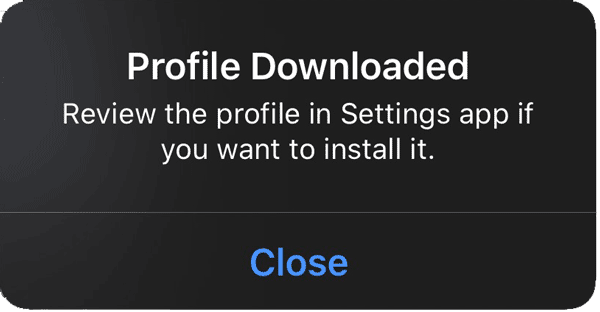
- You will see a prompt like this. It means the profile has been downloaded and ready to be installed
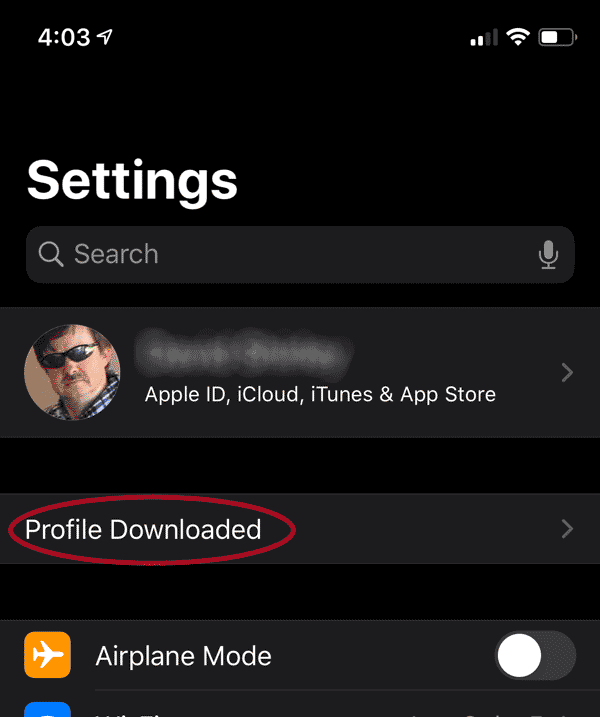
- Go Settings and you will see an option with the label “Profile downloaded” Click it and it will take you to the profile installation page
- Click install on the profile and finish adding the configuration.

Please contact support if you are presented with any error.
Use Letter.is email using Outlook mobile app:
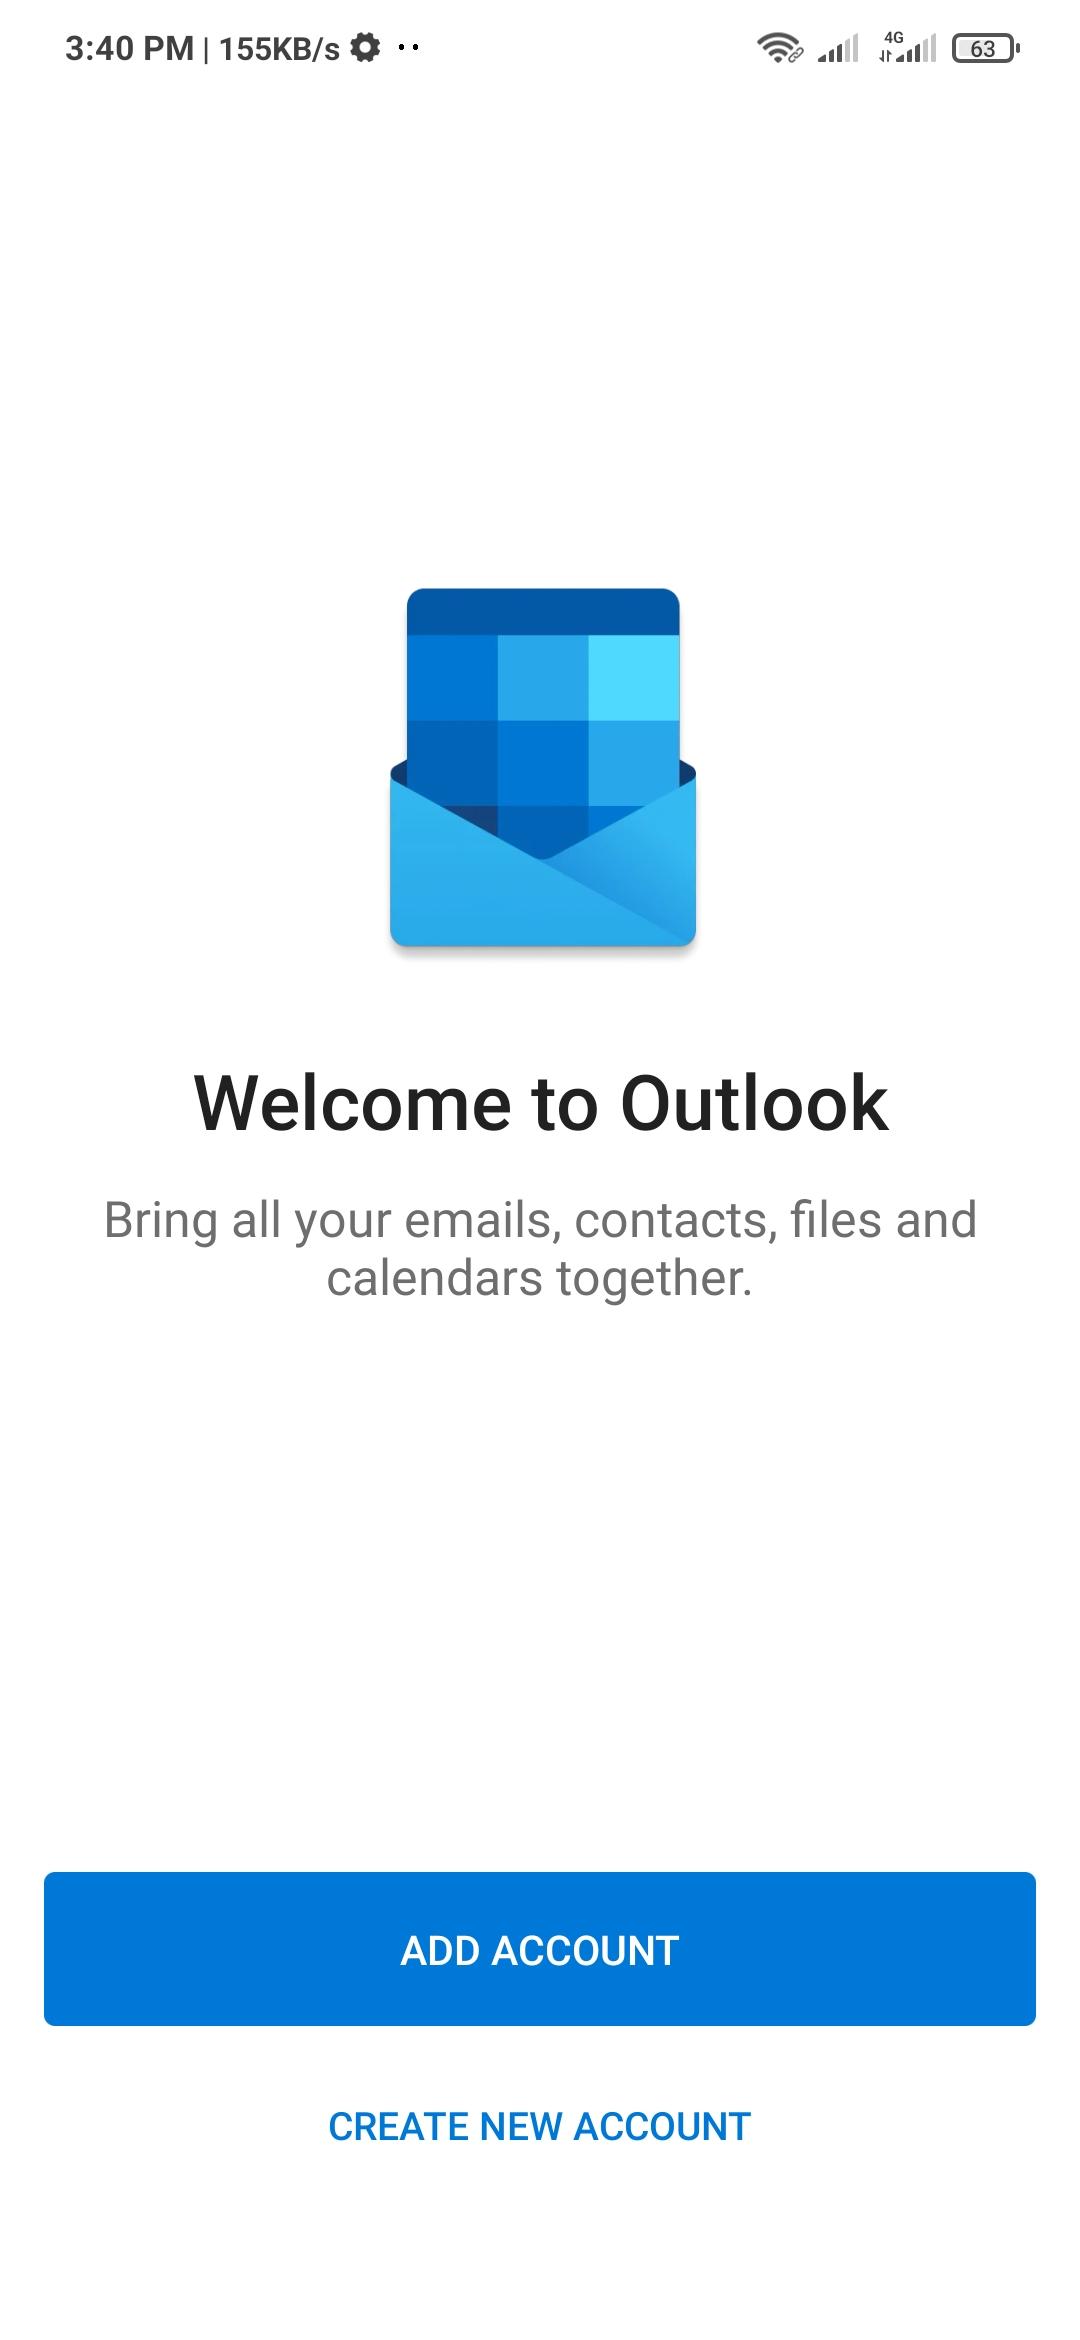
If you use a Samsung smartphone, you may have Microsoft Outlook Email app pre-installed. If you don’t want to install any third party app and want to use Letter.is mailbox with your existing Outlook app, you can do it by following these easy steps.
- Go to your Outlook app. If you already do not have any email account signed in to your Outlook app, you will see the “ADD ACCOUNT” option in the first opening screen. If you already have an account configured in your Outlook app, you have to go to the sidebar > settings > add account.
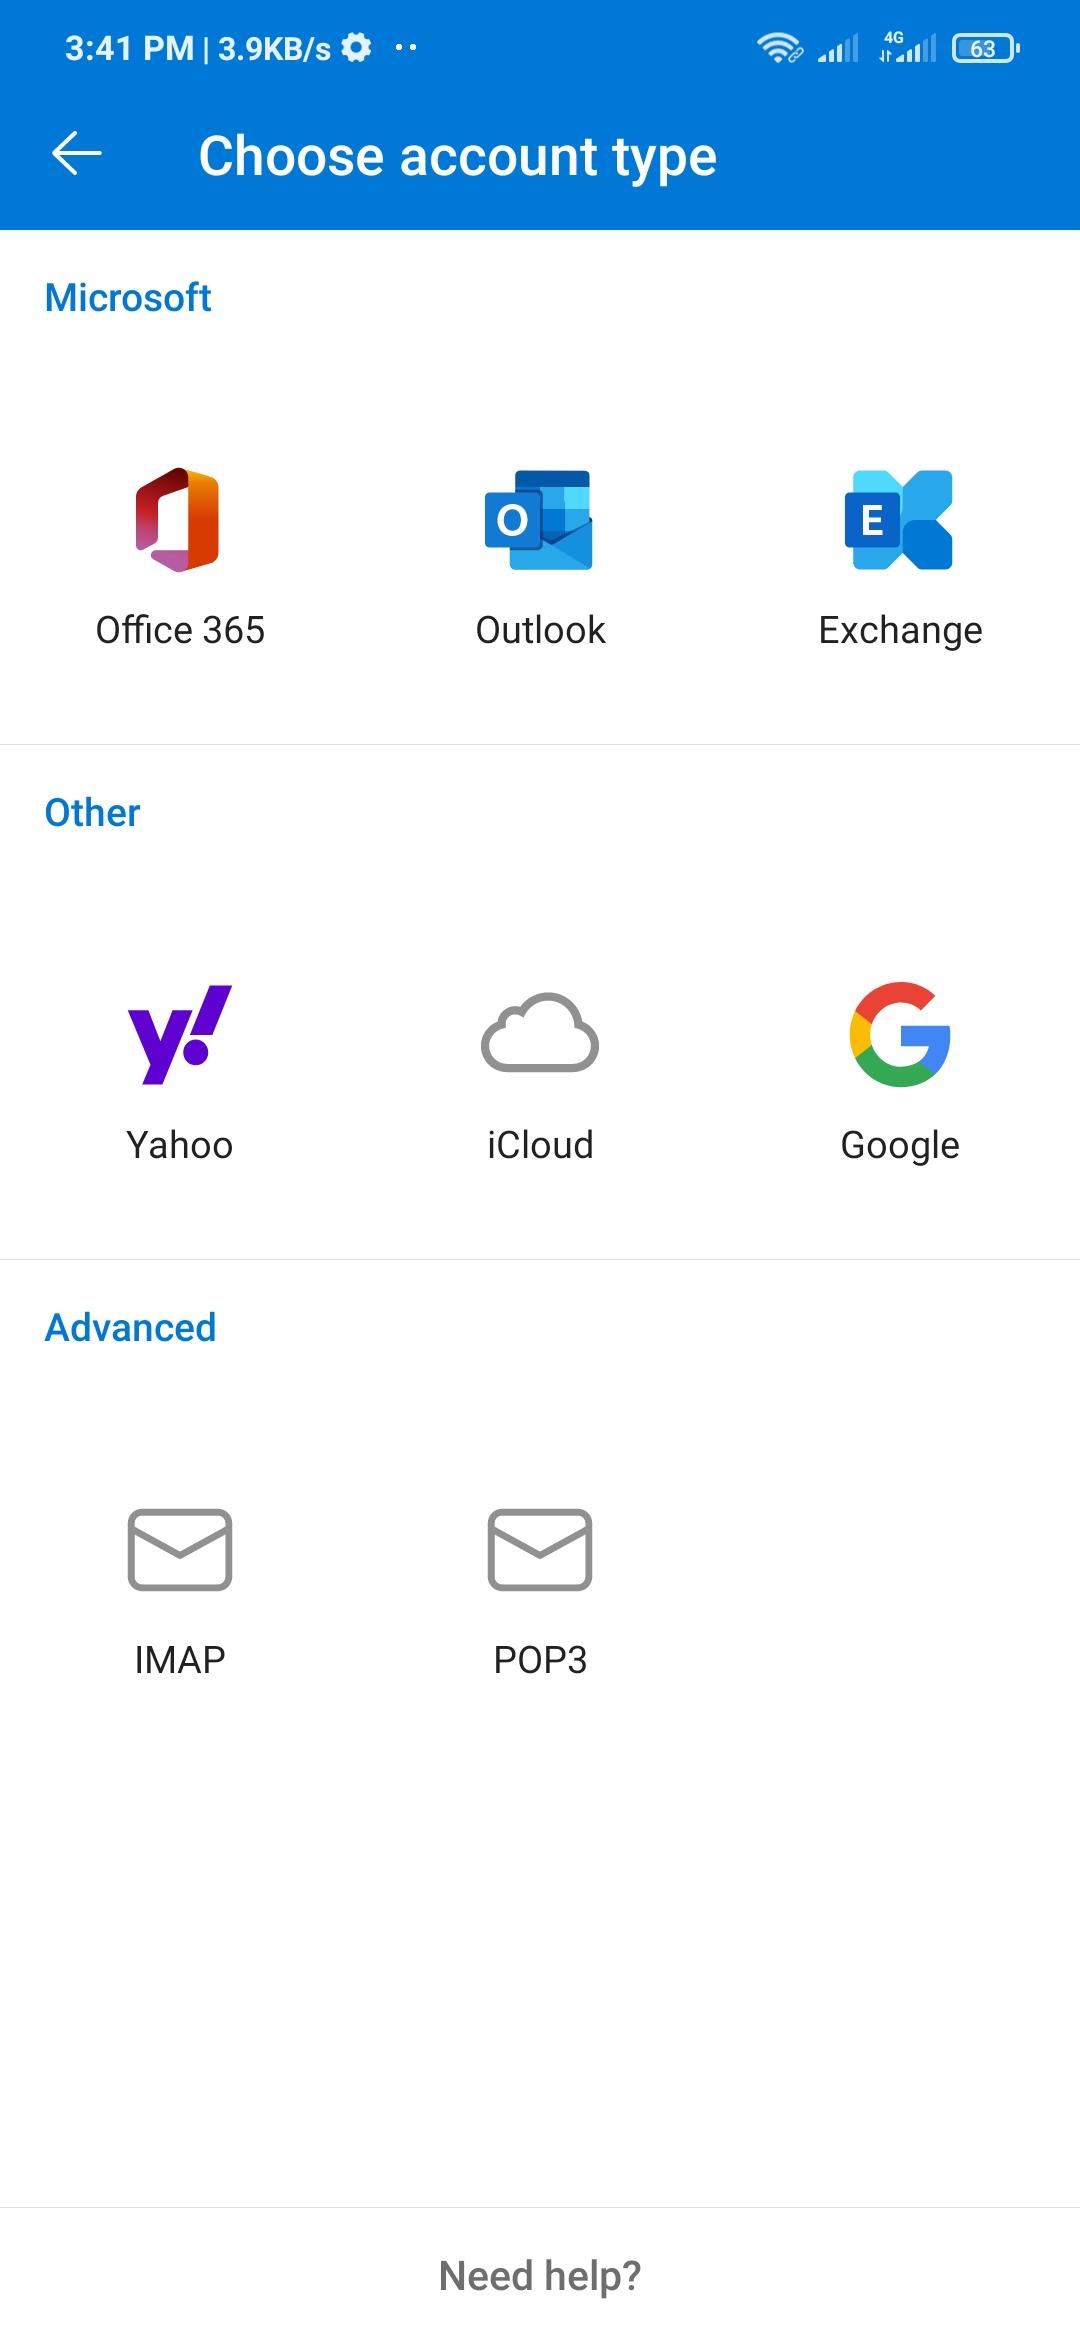
- Select Exchange for the account type
- Enter your email address and click CONTINUE.
- Click “Manual configuration” and click CONTINUE.
- Fill-up the form using this manner:
- Server: mail.letter.is
- Domain / username: Enter your email address again
- Password: This is the password for your email account.
- Description: Enter a one line description like Work, School, Team etc.
- Click the tick mark in the top right corner (next to question mark)
Your mailbox will be added to Outlook mobile app and you can use it for exchanging emails and more. Close the app and relaunch to see your emails.
Accessing emails on your browser
For accessing your emails, calendars, contacts and events on the web using your favorite browser, we have SoGo webmail for you. This is a fantastic webmail client which has all the features you need for modern and rich email experience on the web. We chose SoGo because it is beautiful, modern and feature rich. It has all the functionalities you would use every day.
You access your emails in many ways. There are shortcuts in every step of your admin or user panel. From the login prompt, there is a shortcut that takes you to your inbox.
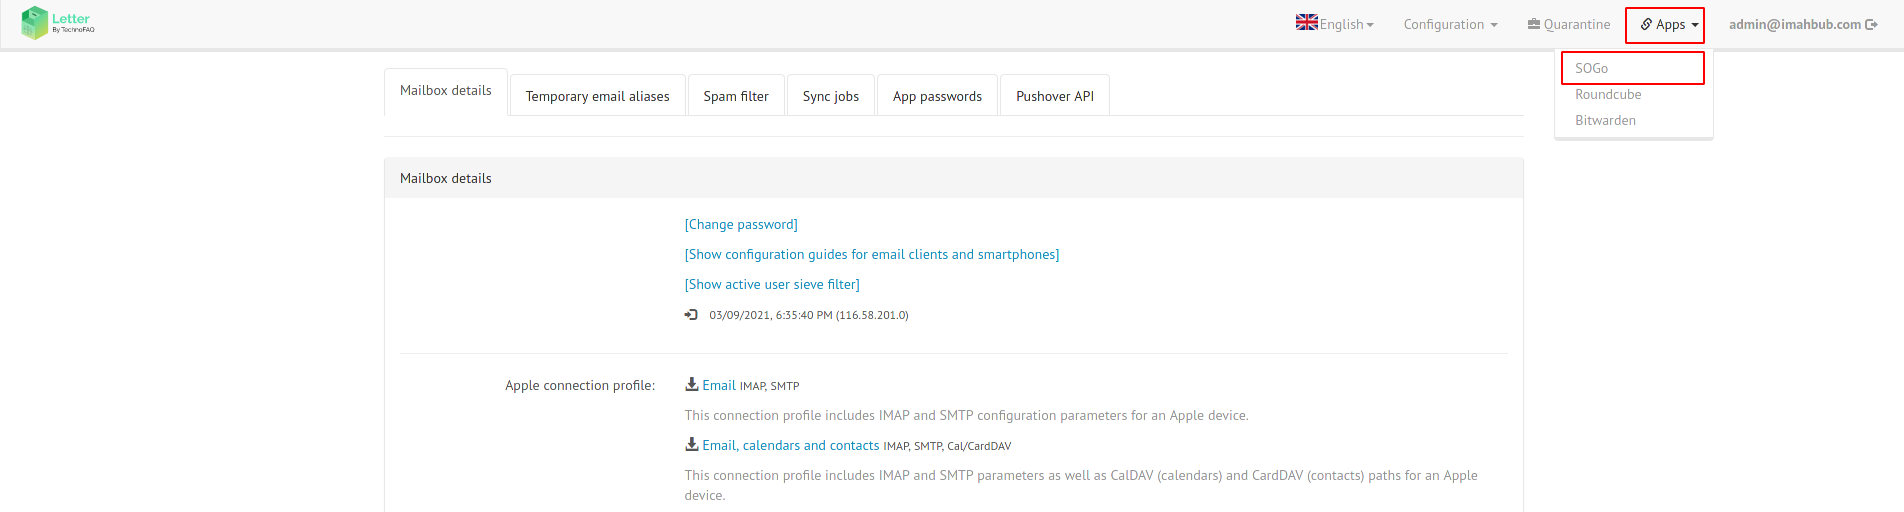
There is another shortcut to your admin/user panel. From the top-right menu bar, you can click Apps > SoGo to access your emails.
Using Letter.is with desktop clients
You can use your Letter.is mailbox with any desktop clients. Setting up desktop clients will allow you to get notifications, unified inbox, additional features and more for your desktop email experience. To set up Letter.is mailbox on your desktop client, it is suggested that you use IMAP settings. It requires extra steps and may be hard for some of you, but many desktop clients do not support ActiveSync.
The settings for Letter.is email are:
Incoming – IMAP
Server: mail.letter.is
Port: 993 (143 for STARTTLS)
Encryption method: SSL
Username: Your email address
Password: Your email password
Incoming – POP3
Server: mail.letter.is
Port: 995 (110 for STARTTLS)
Encryption method: SSL
Username: Your email address
Password: Your email password
Outgoing – SMTP
Server: mail.letter.is
Port: 465 (587 for STARTTLS)
Encryption method: SSL
Username: Your email address
Password: Your email password
Using your Calendars and contacts
You can sync and use Letter.is email on any client that supports Calendar and contact sync via CalDAV and CardDAV. Letter.is also provides an ICS profile for iCalendar. If you want to use calendar on your preferred calendar and contacts, please follow these steps.
Access Calendar through SoGo
You can manage and use your calendar on the web through your Letter.is webmail client SoGo. It contains a calendar and a contact book. Just login to your SoGo webmail client and head to Calendar or contacts.
Accessing Calendar through your own client
If you want to use your own existing email client or calendar client for Letter.is calendar and contacts, you can use these settings:
CalDAV (for calendar): https://mail.example.com/SOGo/dav/user@yourcompany domain.com/Calendar/personal/
CardDAV (for Contacts): https://mail.example.com/SOGo/dav/user@yourcompanydomain.com/Contacts/personal/
Setting up CalDAV and CardDAV for your client
When you sign in to your email clients, they usually automatically synchronize your calendars too. Outlook and lots of other clients have this feature built in. If your email client does not sync your calendar automatically, set up your client manually using CalDAV. Your email and email password is the username and password for your calendar. And your calendar URL is the CalDAV URL mentioned above.
On thunderbird you can download this extension to access CalDAV and CardDAV easily.
On mobile, you can install DAVX5 and synchronize calendar and contacts systemwide. You can then use your synchronized calendar with your default calendar app and contact app.
Import your emails from other email providers
Many people have their emails stored on a previous provider’s server. When you move to Letter.is, you can have those emails imported to your new mailbox. So you do not lose any emails and attachments and continue from where you left. Importing emails is very easy, and you already have the needed tools in your admin and user panels. Sync Job tool lets you sync all the emails and attachments from your previous server. Your emails, email contacts and attachments will be saved to our server and you can access it just like you would on previous providers.
Import from Gmail
It is very easy to import your older emails from Gmail to your new and better Letter.is mailbox. To get started, login to your admin / user panel. Head to the Sync Job tab and you can see the options to import your old emails.
Enable IMAP in your Gmail
Before you import emails with Sync jobs, you have to turn on IMAP access on your Gmail. Follow these steps to turn it on and continue importing mails.
- On your computer, open Gmail.
- In the top right, click Settings > See all settings.
- Click the Forwarding and POP/IMAP tab.
- In the “IMAP access” section, select Enable IMAP.
- Click Save Changes.
You are now ready for importing mails from Gmail. Now follow the below steps to start importing.

To add a new Sync Job for importing emails, you have to click the “Create new Sync Jobs” button. After clicking, you will be presented with a prompt to enter credentials.
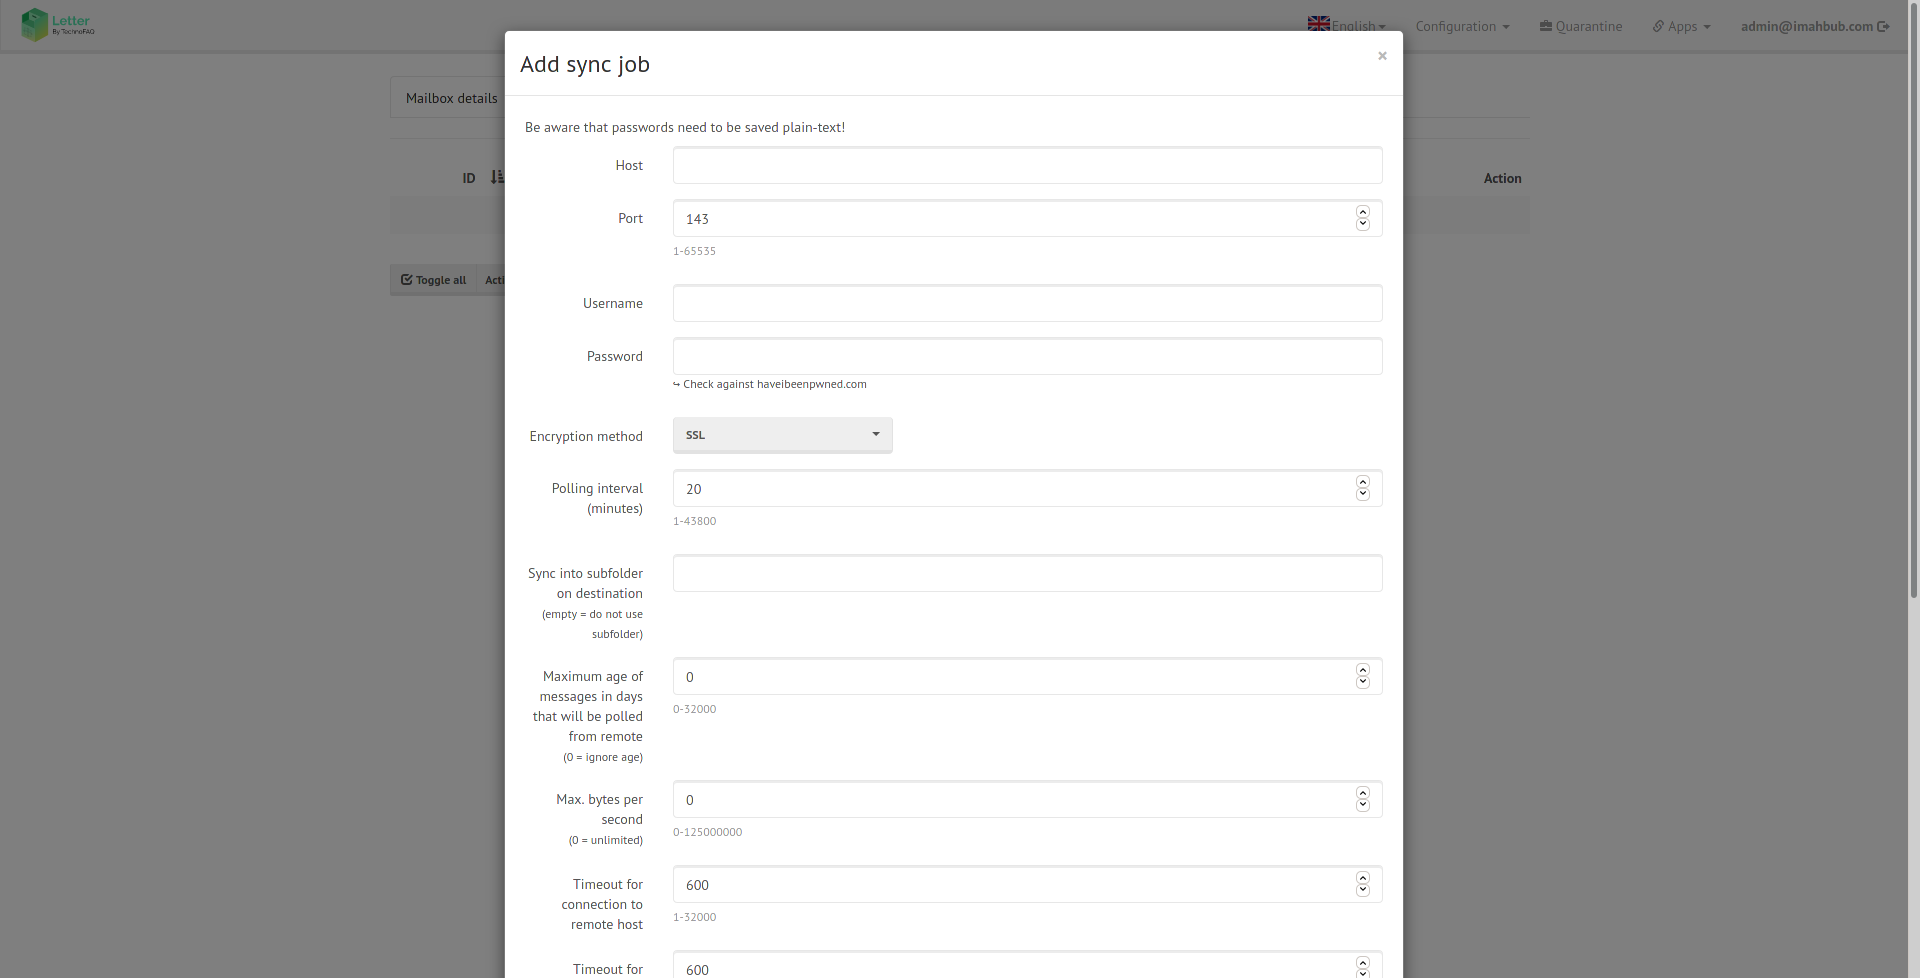
Here is how you should fill it up to successfully import Gmail emails to your new Letter.is mailbox.
- Host: imap.gmail.com
- Port: 993
- Username: Enter your gmail email address
- Password: Enter your gmail email password
- Encryption Method: Select “SSL” from the dropdown menu
We suggest to keep everything as is, but Gmail has limits on how much you can download in a day. So you can set an age limit for your sync. You can set the Maximum age of messages to 183 to import 6 months of emails. Click Add to start the synchronization.
Note: To avoid temporarily locking yourself out of your Gmail account, make sure you don’t exceed 2500 MB per day for IMAP downloads and 500 MB per day for IMAP uploads limit set by Gmail. Try to limit Age in the parameters to reduce load.
Import from Outlook
If you want to import your emails from your Outlook account, you can do it easily. Since Microsoft Outlook allows users to use other mail clients easily, they do not enforce any strict limit like how Gmail does. To get started, follow these instructions.
- Host: outlook.office365.com
- Port: 993
- Username: Enter your Outlook email address
- Password: Enter your Outlook email password
- Encryption Method: Select “TLS” from the dropdown menu
We suggest keeping everything else as is. Click Add to start the synchronization.
Outlook has no limitation for how much you data you can import or sync. If you encounter any error, please contact support.
Import from Zoho
If you use custom domains in your Zoho mailbox, Importing from Zoho is only possible if you have a premium account. Zoho only allows IMAP access if you have premium subscriptions. So free users have to either upgrade to paid plans, or opt for a trial and then enable IMAP access before trial runs out.
To enable IMAP access do the following:
- Login to Zoho Mail
- Go to Settings
- Navigate to Mail Accounts >> Configure IMAP
- Under the IMAP section, check the IMAP Access box.
To import mails from Zoho, do these:
- Host: imappro.zoho.com
- Port: 993
- Username: Enter your Zoho business email address
- Password: Enter your Zoho email password
- Encryption Method: Select “SSL” from the dropdown menu
Keep everything else as is unless you know what you are doing. Click Add to start the synchronization.
Note: If you have a free account and you do not have any custom domain added to your Zoho account, you have to use “imap.zoho.com” as Host. Your address should look like “username@zoho.com.” For further clearance, you can check this doc by Zoho.
Import from iCloud
To import from iCloud, you have to first generate an app specific password. To set up an App specific password, please follow this instruction by Apple. After setting up an app specific password you will be good to go and import your iCloud emails. Please use these options for importing iCloud emails.
- Host: imap.mail.me.com
- Port: 993
- Username: Enter your iCloud mail address
- Password: Use the generated app specific password
- Encryption Method: Select “SSL” from the dropdown menu. If it shows error, use “TLS” instead.
We suggest keeping everything else as is. Click Add to start the synchronization.
Import from other providers
Please refer to your providers documentation for IMAP settings and use those to import your emails. This is usually very easy and your provider likely has clear documentation on it. If you cannot do it yourself, please contact support so we can help you import your emails. Your IMAP configurations will usually look like this.
- Host: imap.yourprovider.com (your provider’s server name for IMAP or POP3)
- Port: 993 (usually it is same for every provider, but sometime it can be 143 or other ports)
- Username: Enter your email address
- Password: Use the password for that email address
- Encryption Method: Most of the time it is SSL, but you can try other options if it fails.
Please contact support if you need help. We are always ready to help you to use Letter.is with convenience and ease.
Securing your mailbox
It is always better to secure your mailbox with various security features. You can implement various security checks and steps to ensure safety of your emails. Letter.is encrypts your emails and keeps them secure from middle-man attacks and snooping. Along with privacy, Letter.is has the most secure server to protect your emails from breaches and attacks. From strong spam detector to malware blocker, everything needed to make your experience secure and safe is available in Letter.is.
But, users have choices to secure their mailboxes further. We include various features and tools you can use for that. You can set up two factor authentication to add another layer of security on top of your password based login. You can even set app passwords for IOT and other logins so you can revoke a specific password instead of changing your main user password.
Securing emails with 2FA
2FA stands for Two Factor Authentication. When 2FA is enabled, you have to enter an additional key or PIN to unlock your mailbox. This adds an extra layer of security and stops unattended or malicious login attempts even if the attacker knows your password. Letter.is lets you enable 2FA on your Admin panel and SoGo webmail and Roundcube.
2FA in Admin panels
You can enhance security for your administrative panel by enabling TOTP based 2FA. TOTP is Time Based OTP and it is used by Google Authenticator, FreeOTP etc. You can enable it if you want more security for your admin panel, and to do it, you can follow these easy steps.
- Go to your admin panel and log in
- On the very top of the page, there is an option named “Configuration”
- Click it and select “User Settings”
- On the Set two-factor authentication method, select your preferred method of 2FA
- For TOTP via apps, please select Time based OTP
- You will be presented with a modal
- Enter an identifier or a name for this 2FA (e.g. Android login)
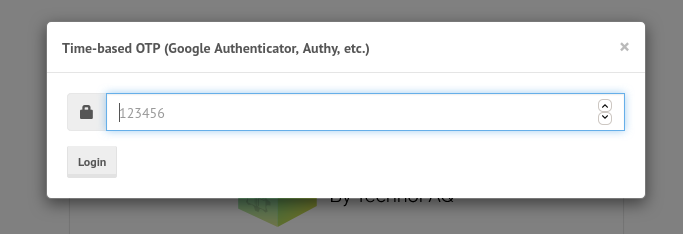
- On the next field, enter your admin password
- Now go to your authenticator app (Google Authenticator, Authy etc.) and scan the QR code with the authenticator. If you cannot scan QR code, you can use TOTP code just below the QR code
- Your Authenticator app will now start showing authentication keys, enter the key to confirm that your setup is working and then click Add to finish adding 2FA successfully.
2FA in SoGo
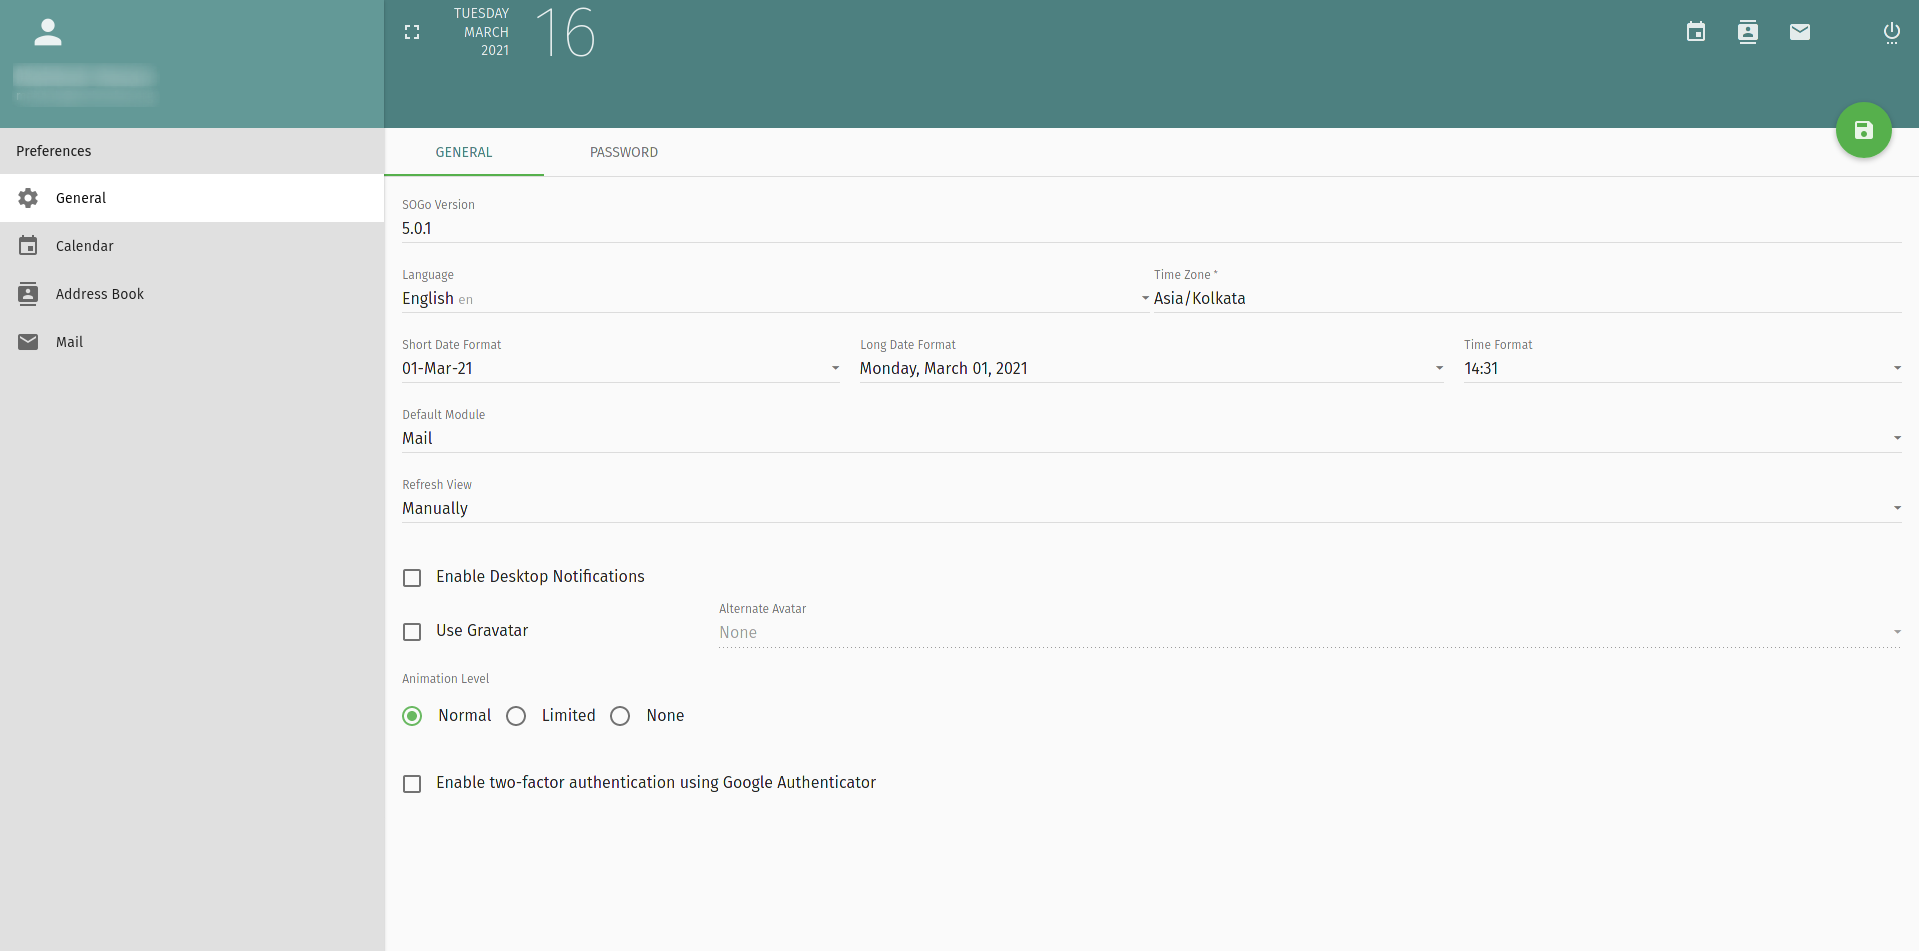
On the user end, you can use 2FA to protect your mailbox. To enable 2FA on SoGo, follow these easy steps.
- Login to your SoGo webmail
- Go to settings > General
- Check the box for Enable two-factor authentication using Google Authenticator
- Go to Google authenticator on your phone
- Scan the QR code with the Google Authenticator
WARNING: If you do not scan the QR and you leave the checkbox checked, you will not be able to login again! So be sure to uncheck the box if you don’t want to use 2FA. If you face any problem, let us know and we will help.
2FA in Roundcube
Note: There are reports from users who are facing problems when enabling 2FA in RoundCube. We have disabled 2FA for security temporarily. This part will be updated soon, we are very sorry for the inconvenience.
Passwordless authentication
Many people, especially organizations and businesses, opt to use special hardware keys instead of passwords. It is more secure as you need to physically attend the login operation and use the key to login. Letter.is can be secured by FIDO2/WebAuthn, eliminating the need for passwords and malicious remote logins.
To enable login via keys, you need to first set it up. To do this:
- Go to your admin panel and log in
- On the very top of the page, there is an option named “Configuration”
- Click it and select “User Settings”
- From Login with the FIDO2 section, click Register FIDO2 Device
- Your browser will ask for permission to use FIDO2 key
- Confirm browser permission and insert your key / press fingerprint scanner
- Check if it is registered
If it is registered successfully, you can use this key to login to your admin panel.
Using our webmail clients
For accessing emails from anywhere, we have a webmail client. With two choices, both equipped with 2FA. We use SoGo and Roundcube for webmail and they both have different use cases. You can keep both on, or contact us to disable one of them for you. There may be many cases where you need both, so we give you the option to use both.
Using SoGo.
SoGo is our webmail of choice. Armed with tons of features and tools, it is number one choice for a groupware for many. It is fully open source and secure. It of course has email, but also calendar and contact built in. This eliminates the need for different apps for different email features.
When logged into SoGo, you will be presented with the default view which is your inbox. On the sidebar you can access inbox, outbox, sent, trash and junk folder. Junk folder contains spams and potentially unwanted messages. On the top right corner, you will see icons for accessing contacts and calendars.
To select one or multiple emails from your mailbox, click on the user icon. You will be able to select emails for deletion and other actions.

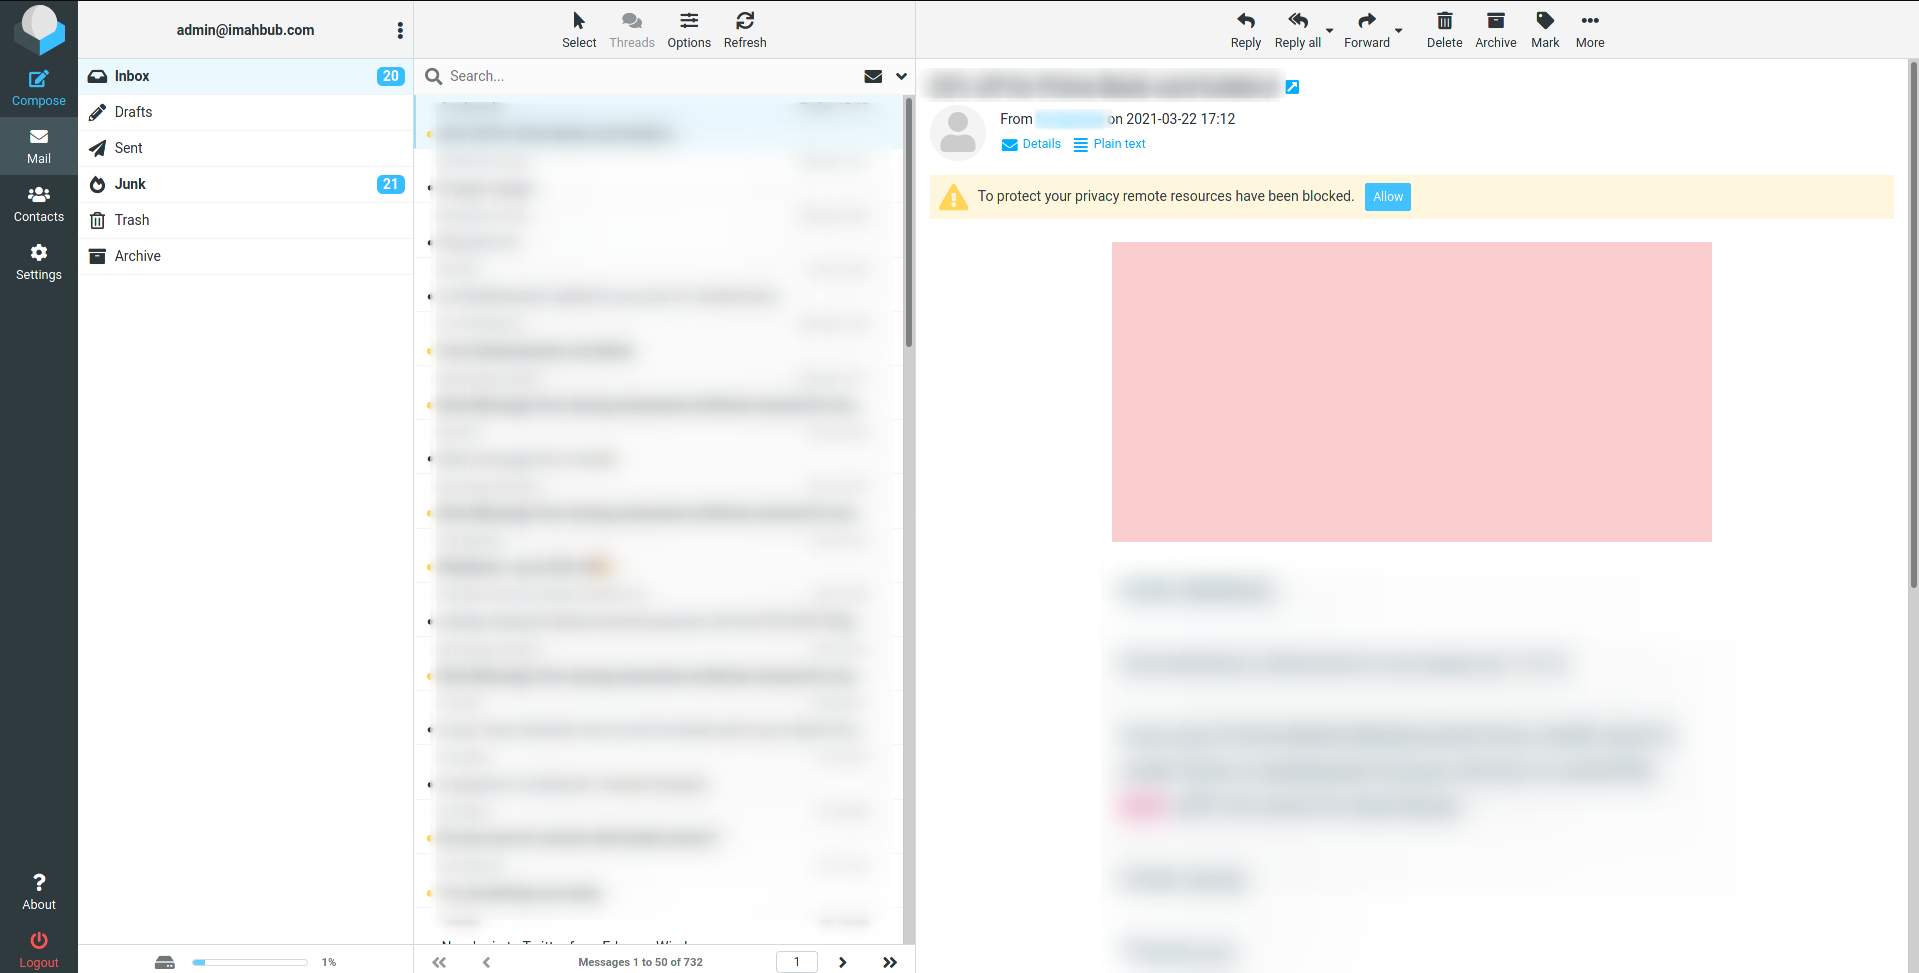
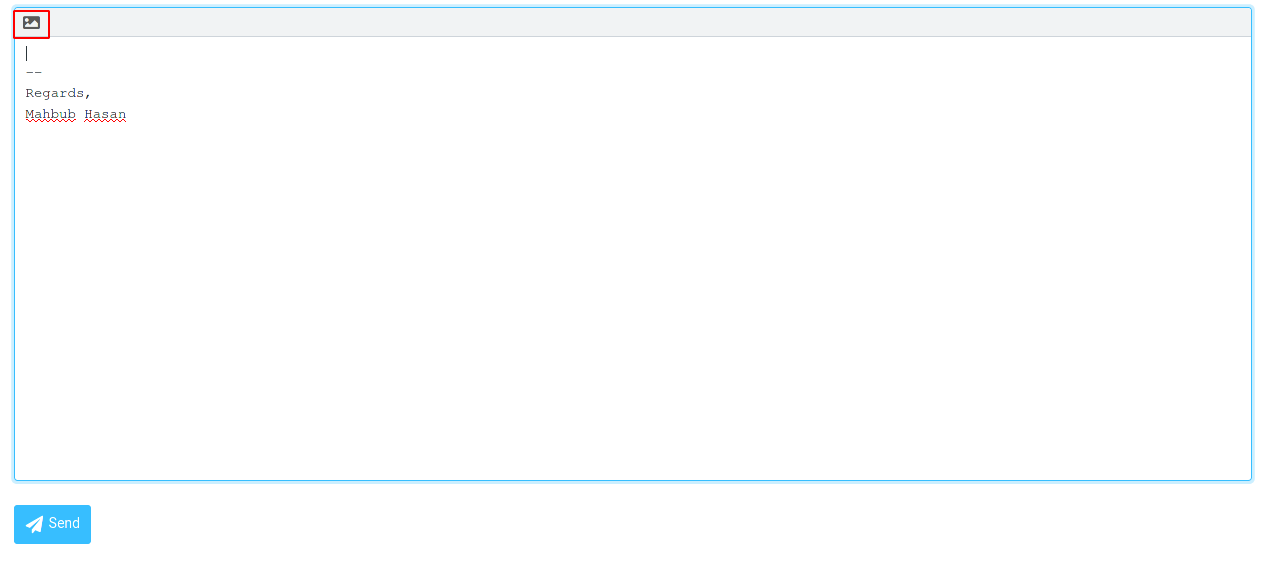
How to show images on your emails?
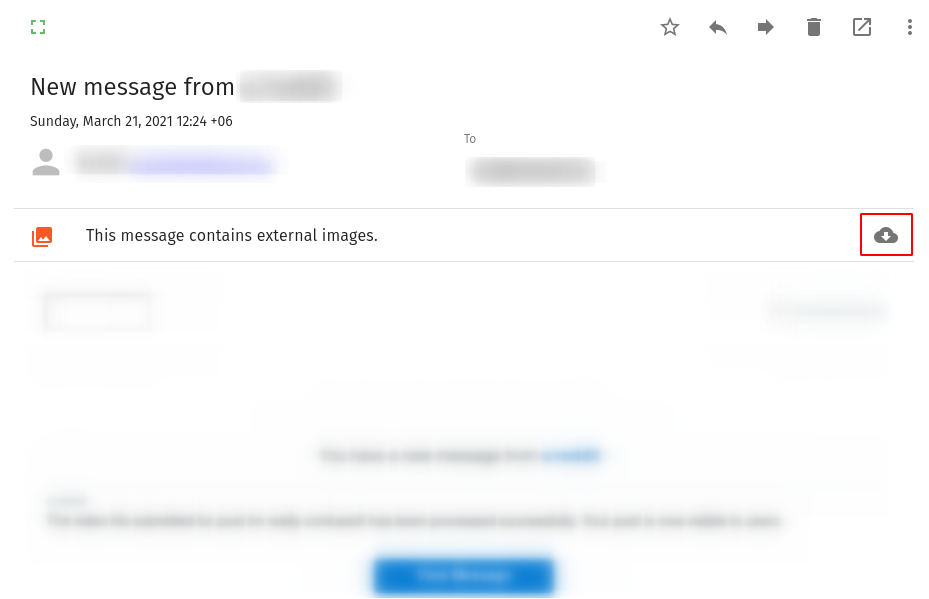
Our webmail clients block remote content to stop users from email tracking. This stops the media from collecting information about your client, location and other identifying data. By default, it stops every remote content. So you may not see images embedded in your emails. To unblock images, simply open an email and click the download icons as shown in the picture.
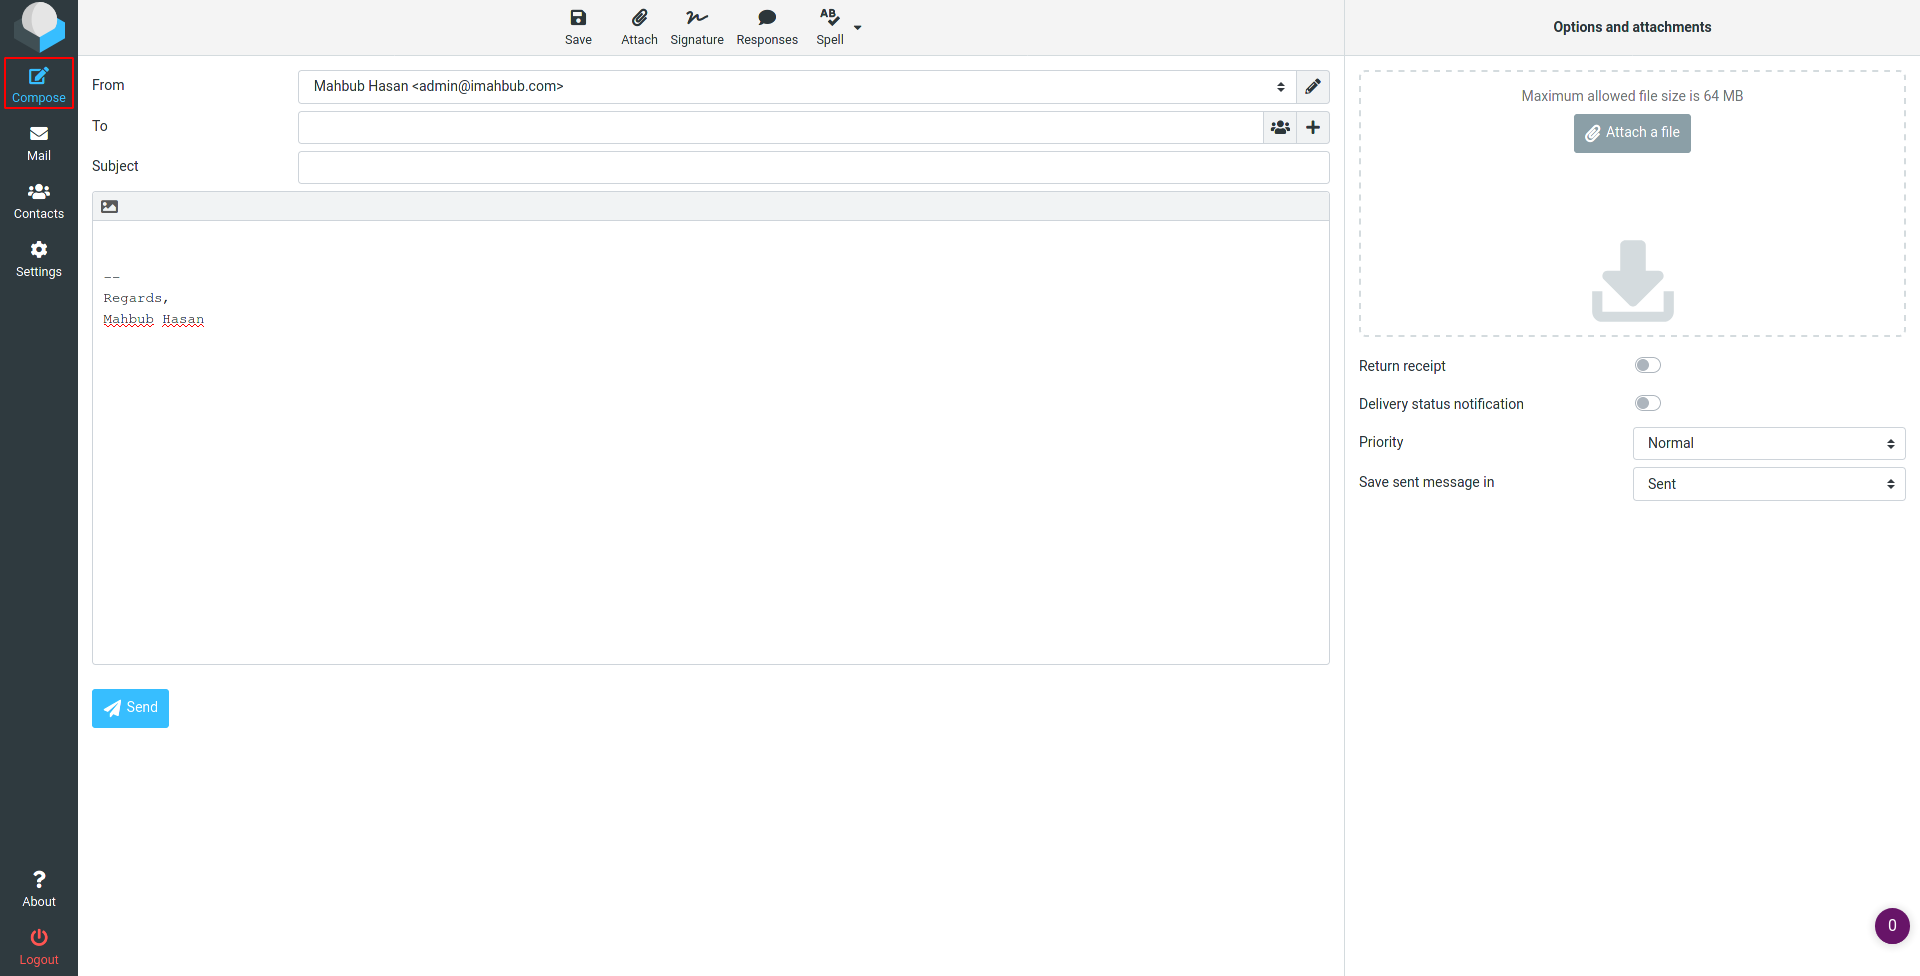
How to write an email?
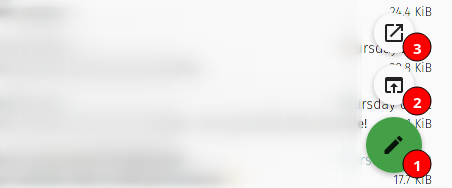
To start composing mails, you have to click the pencil icon (1) located at the bottom of your inbox email lists. After clicking it, you will be presented with two options. One is for using an editing modal in the current window (2) and another one is for composing emails on a separate window (3).
How to forward your emails to another address?
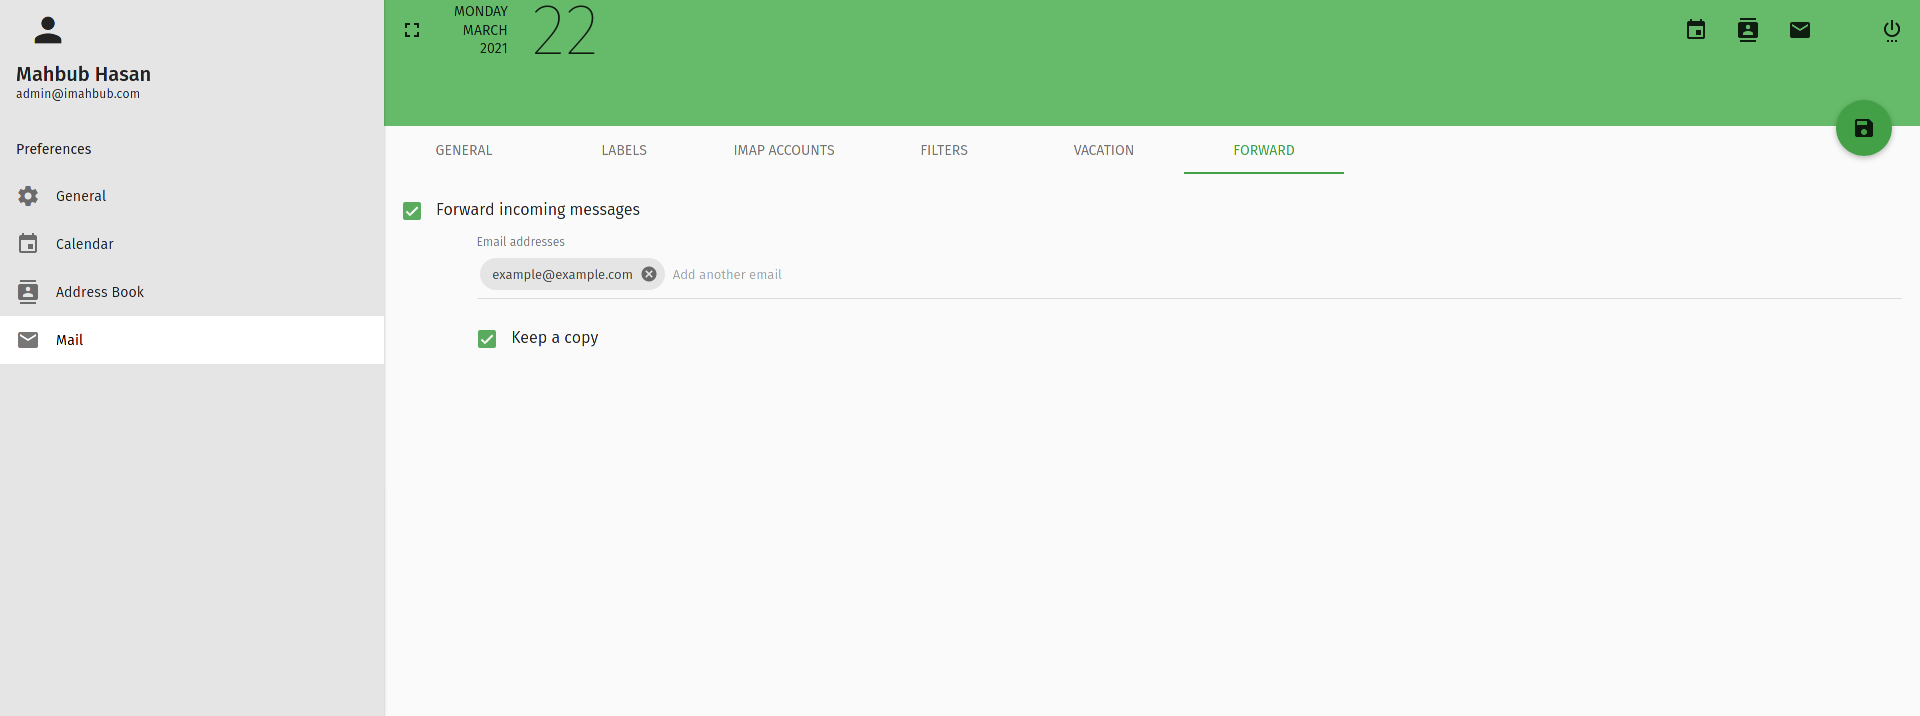
To forward incoming mails to another email address, you can follow these steps:
- Go to settings
- Go to Mail from settings
- Head to “Forward” tab’
- Check Forward incoming messages box
- Enter addresses you want your emails to be forwarded to
- You can also keep a copy of incoming messages in your inbox. For this, click “Keep a copy” checkbox
- Click the save or floppy icon to save the settings
How do I select multiple emails, mark them as junk, delete or archive?
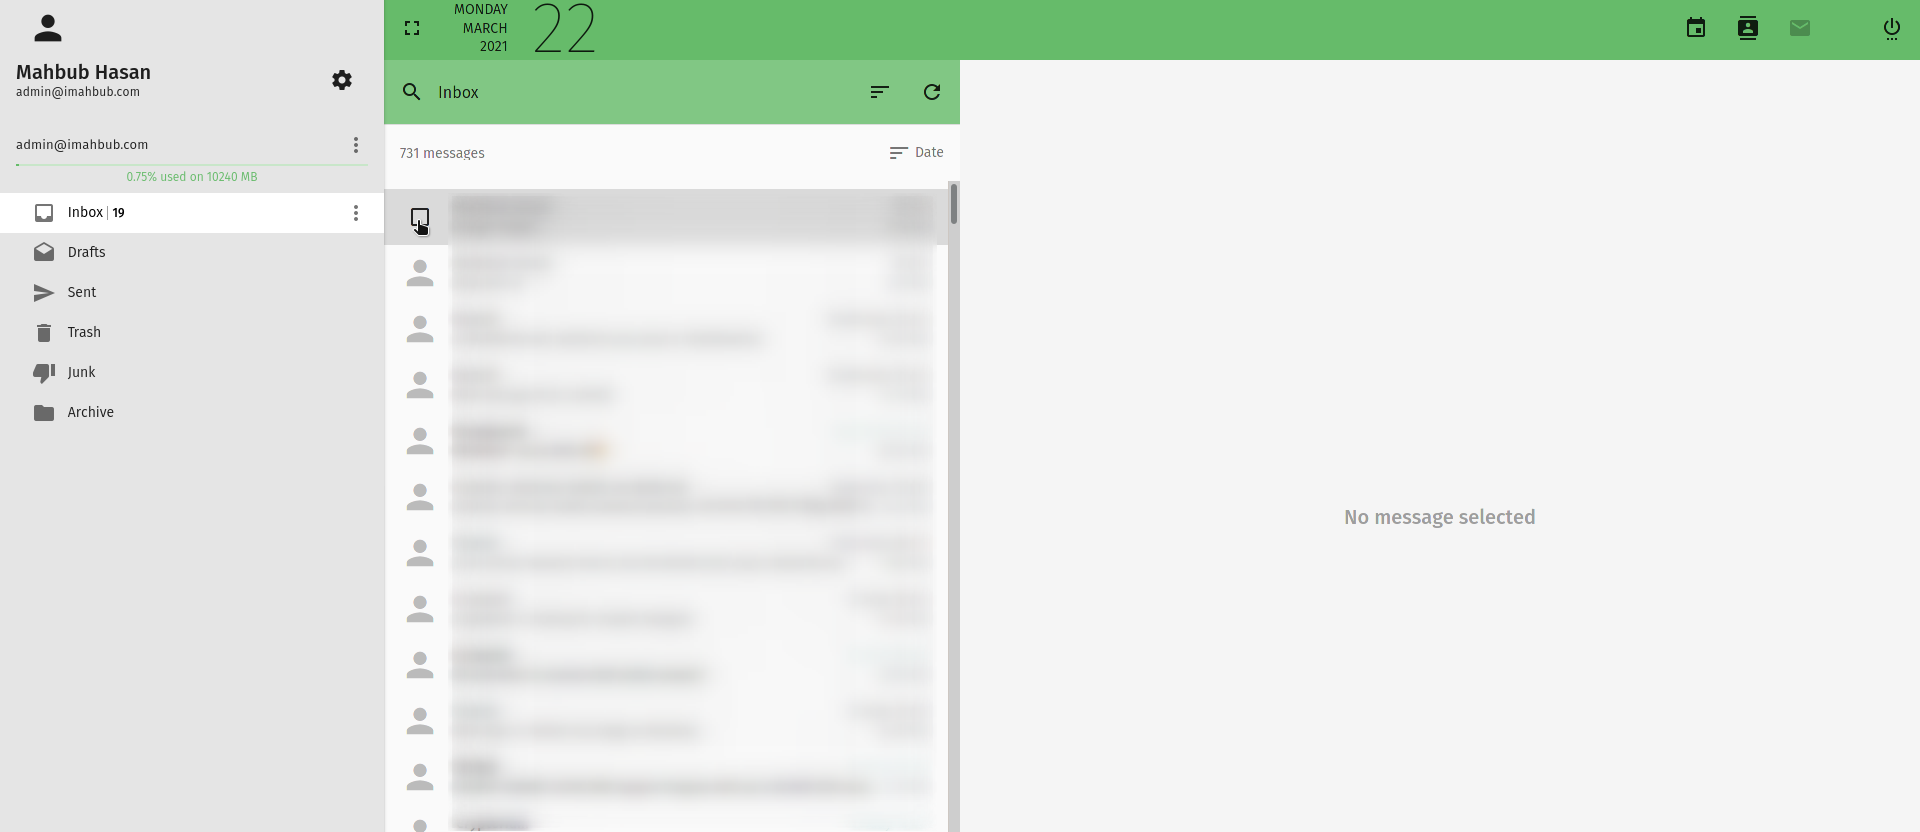
When you hover over the profile photo icon, or user icon, a selection checkbox will appear. You can then click the box to select multiple emails.
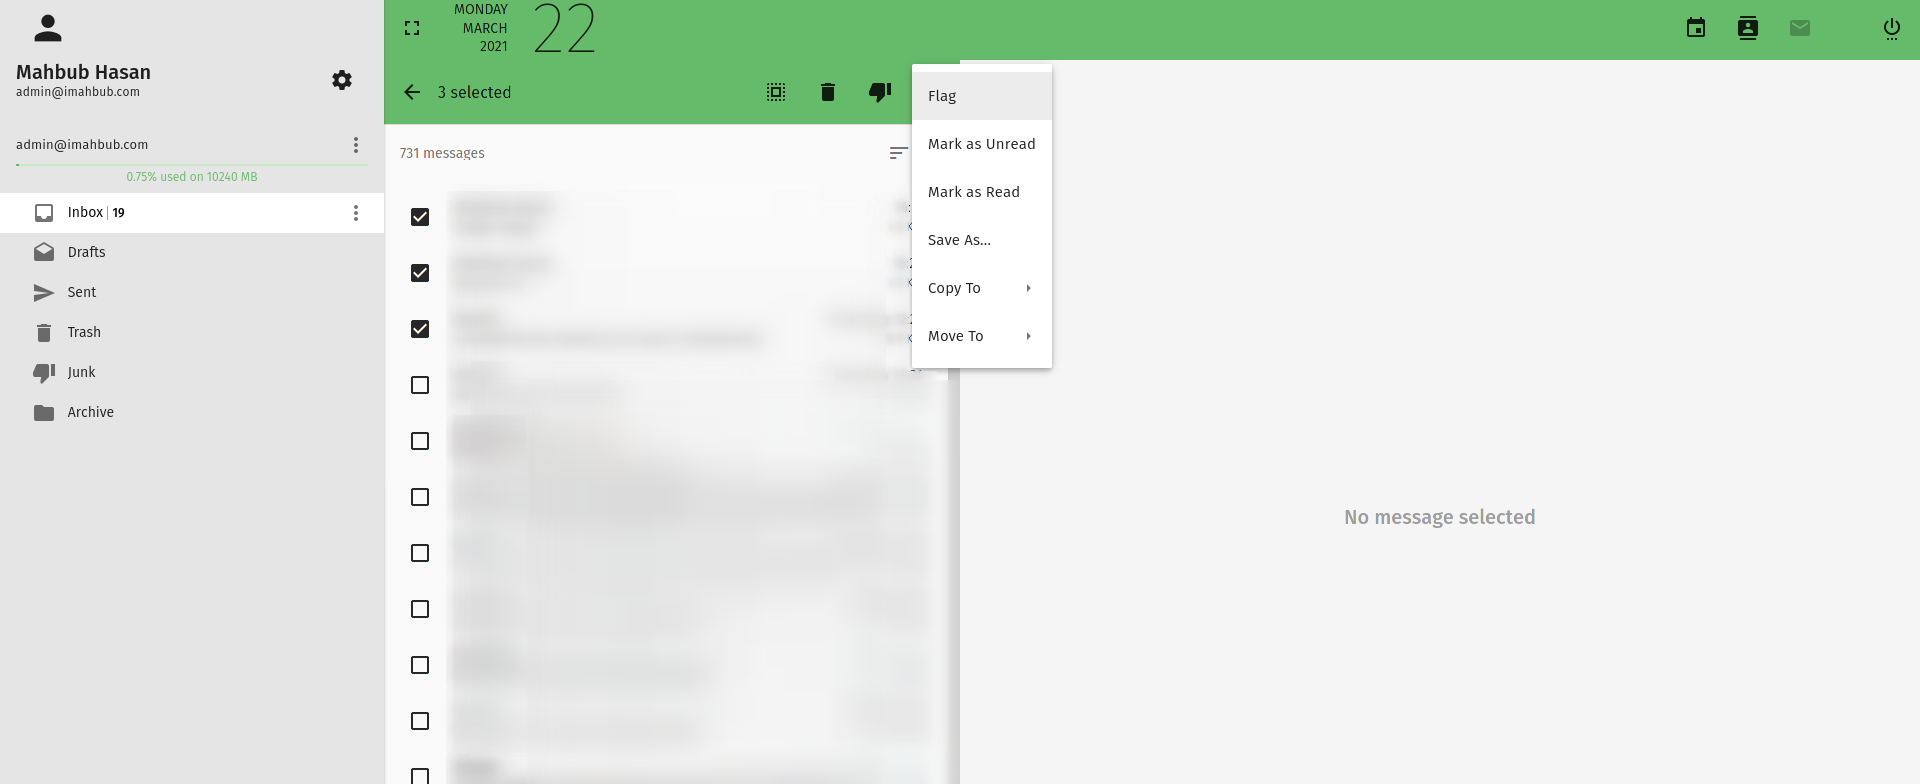
After selecting your emails, you can select all in one click, delete, mark emails as junk or move selected emails to folders. You can also mark emails as read and unread.
How to archive emails in SoGo?
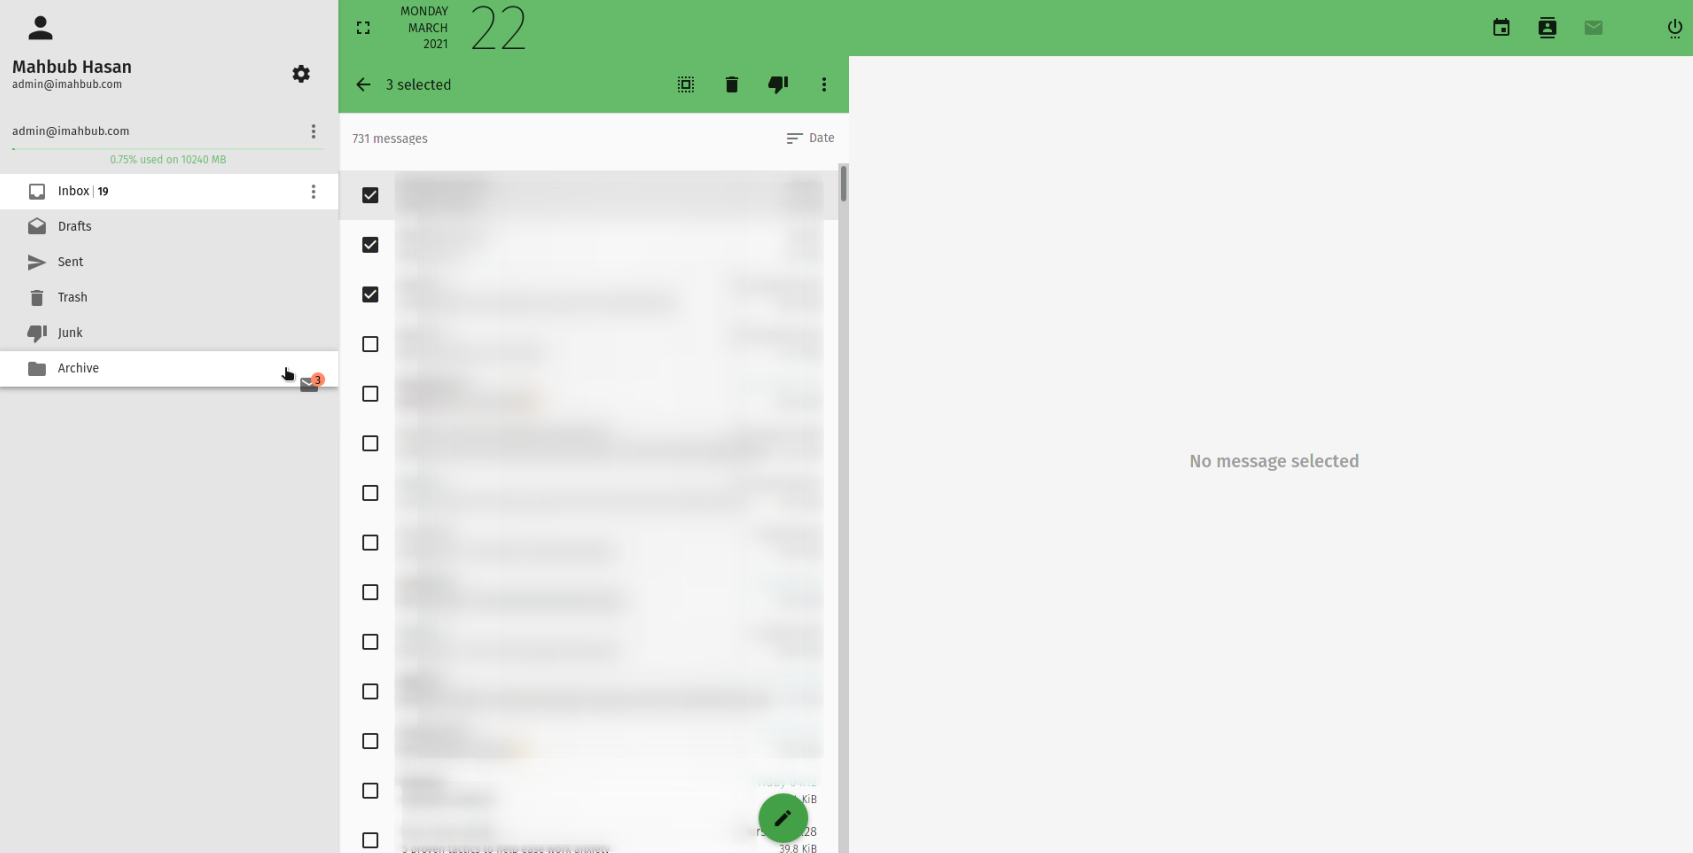
To archive selected emails, you can select emails and drag them to the Archive folder. This drag and drop feature works for other folders too, but it moves the emails instead of copying. So if you want to copy your emails, use the three dot menu after selecting emails, and select “Copy to”.
How to search by criterias in SoGo?
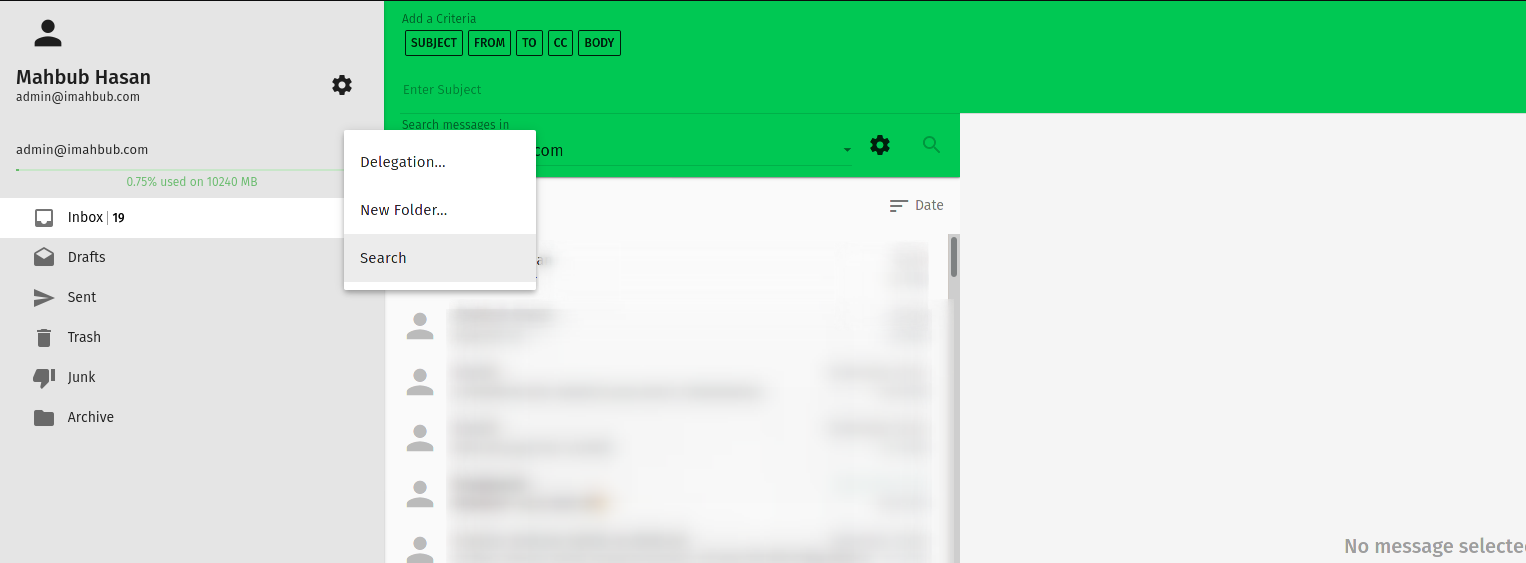
If you click the three dot menu near the folder you are currently in, you will be presented with a flyout menu. Here you can manage delegation, create new folders and have the advanced search option. Letter.is offers full text search without disabling encryption, so you will be able to search your emails without an issue. Click Subject to search inside subjects and click other criterias per your wish. After entering keywords, press the search icon to begin search.
How to access my address books in SoGo?
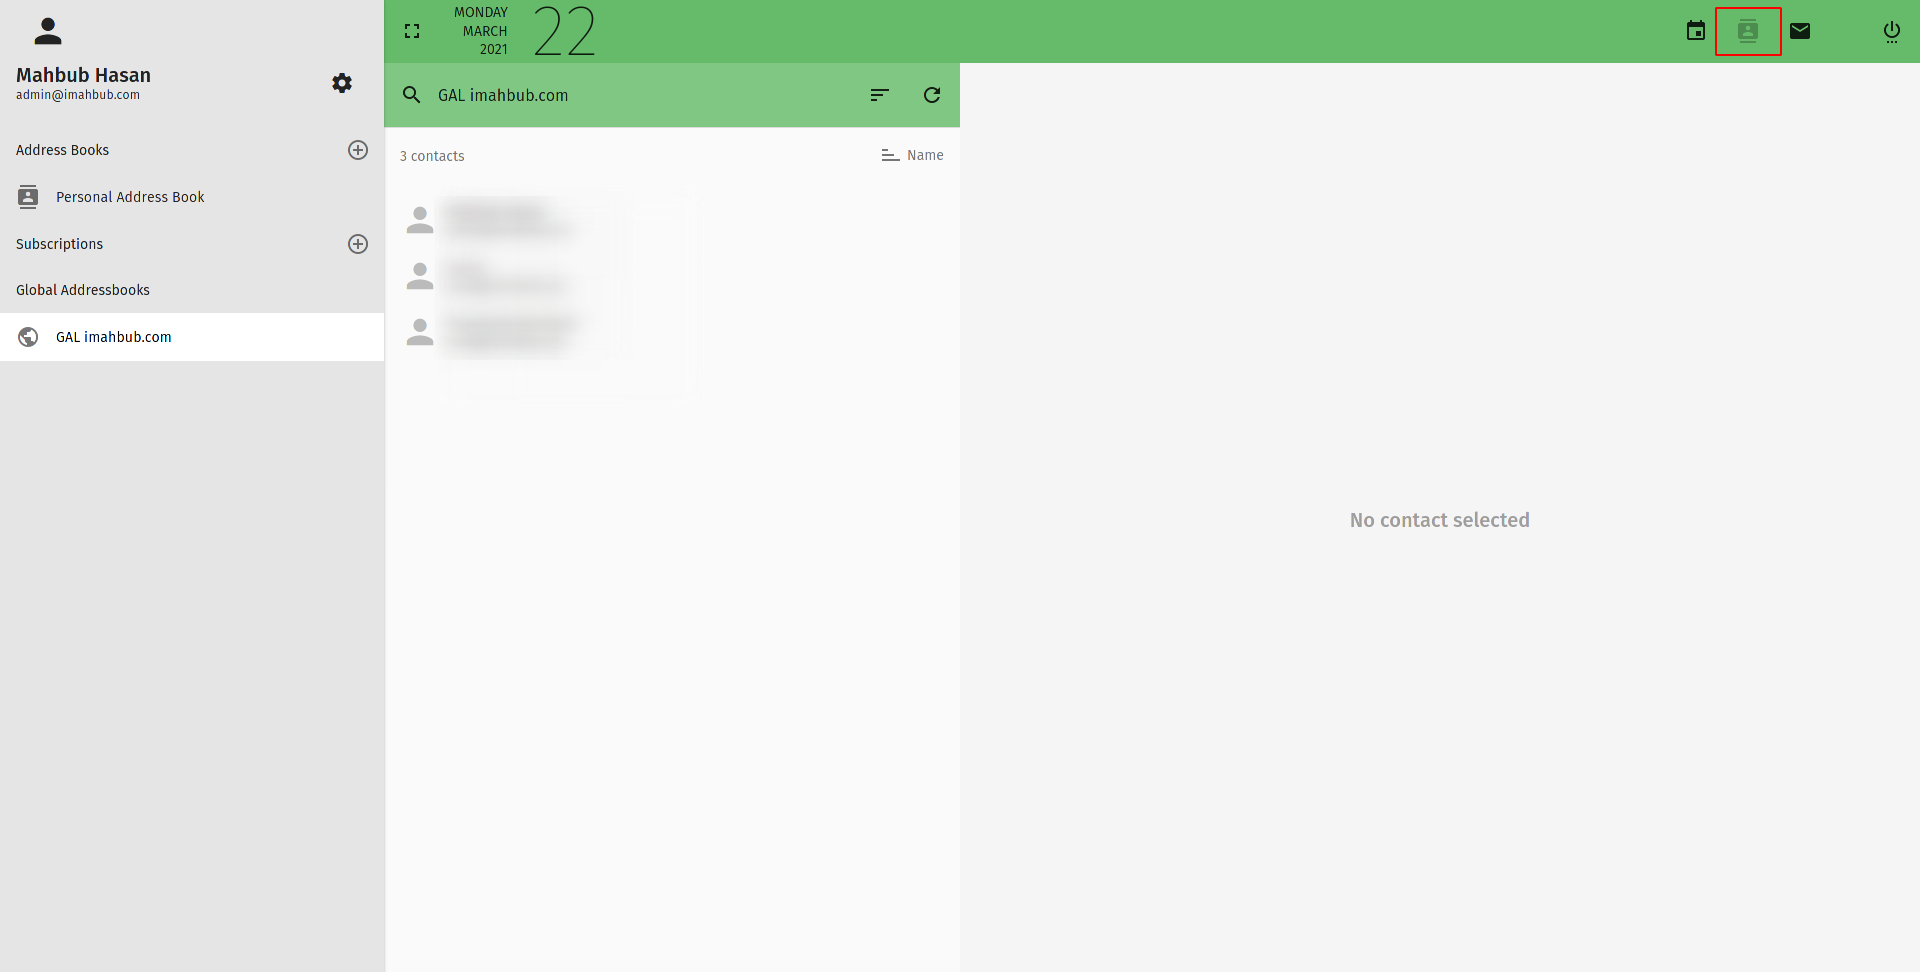
On the top most corner, you will see there are icons for calendars, contacts and email views. If you click on the contacts icon (second from left), you will be able to access and manage your address books.
How to access your calendars in SoGo?
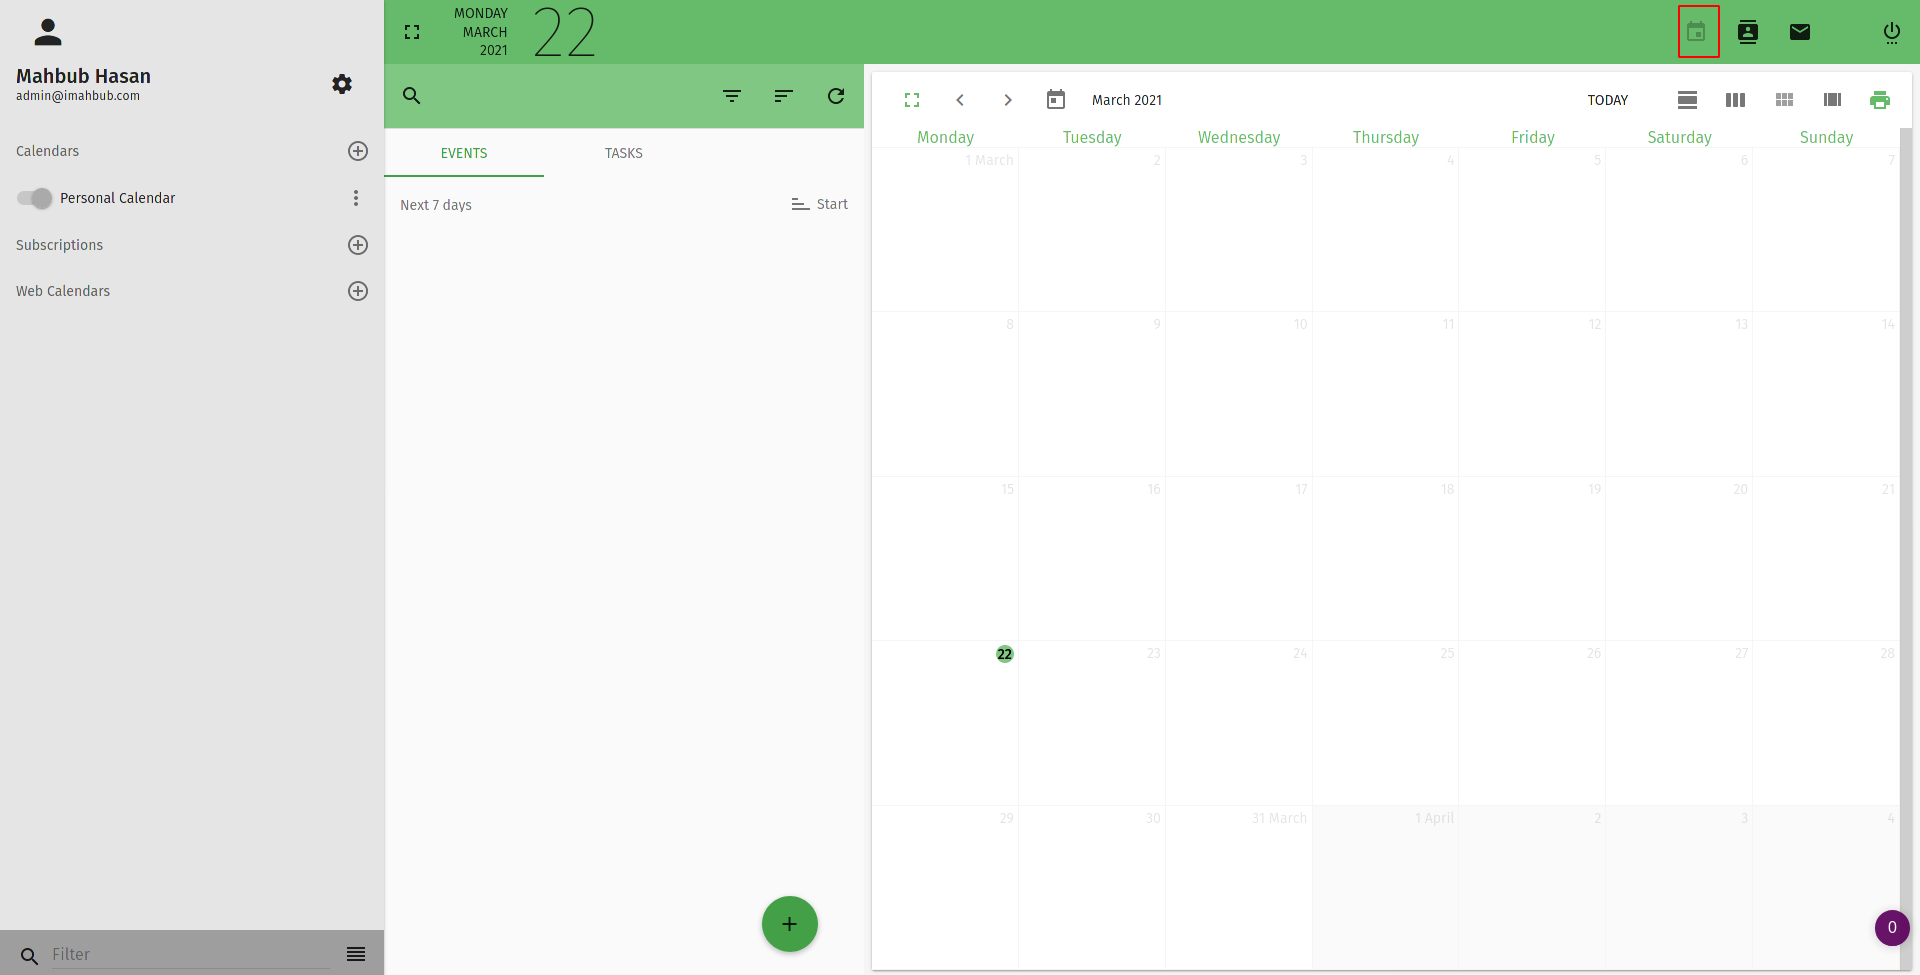
If you click the calendar icon, you will be able to access and manage your calendars. All your events and tasks will be listed here. To add a task or event, press the plus icon at the bottom and you will be able to add tasks or events. Added events will be synchronized between connected devices and clients. Tasks can only be synchronized between clients that support Tasks sync.
Using Roundcube
Roundcube is a beautiful basic email client which comes enabled by default for Letter.is subscribers. You can contact support to disable it for you or keep it enabled. It is a beautiful minimal webmail client with only Emails and Contacts features built in. There is no calendar in Roundcube, so you have to use SoGo or your own client to access the calendars.
Why RoundCube?
While SoGo is our “go to” email client and is feature rich, some users may find it very clunky or heavy for their use cases. Specially if you are using your Letter.is for personal usage, you may only need basic email features. To give you a simpler yet beautiful option, we provide RoundCube webmail alongside SoGo. RoundCube is very fast and minimal and only has the features you absolutely need and nothing else.
How to write emails using RoundCube?
When you click compose in the left sidebar, you will be taken straight to the editor where you can compose emails, add attachments and do various tasks.
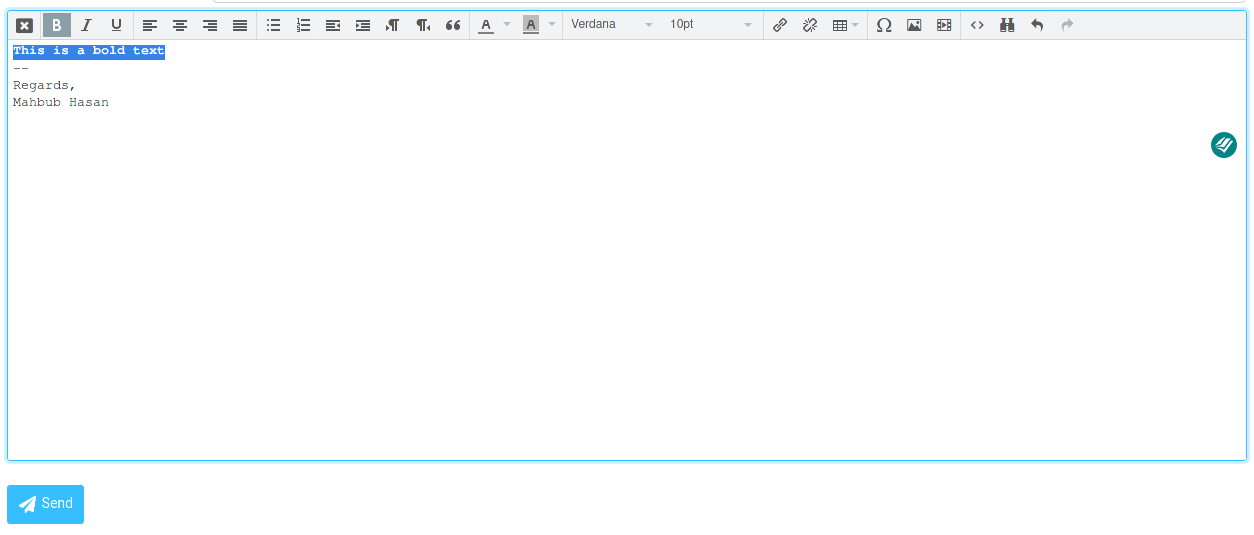
How to format texts in RoundCube?
If you want to format your texts with styles, you can enable rich text mode in the composer. Just click the icon marked in the photo and you will be presented with a WYSIWYG editor.
How to edit your default signatures in RoundCube?
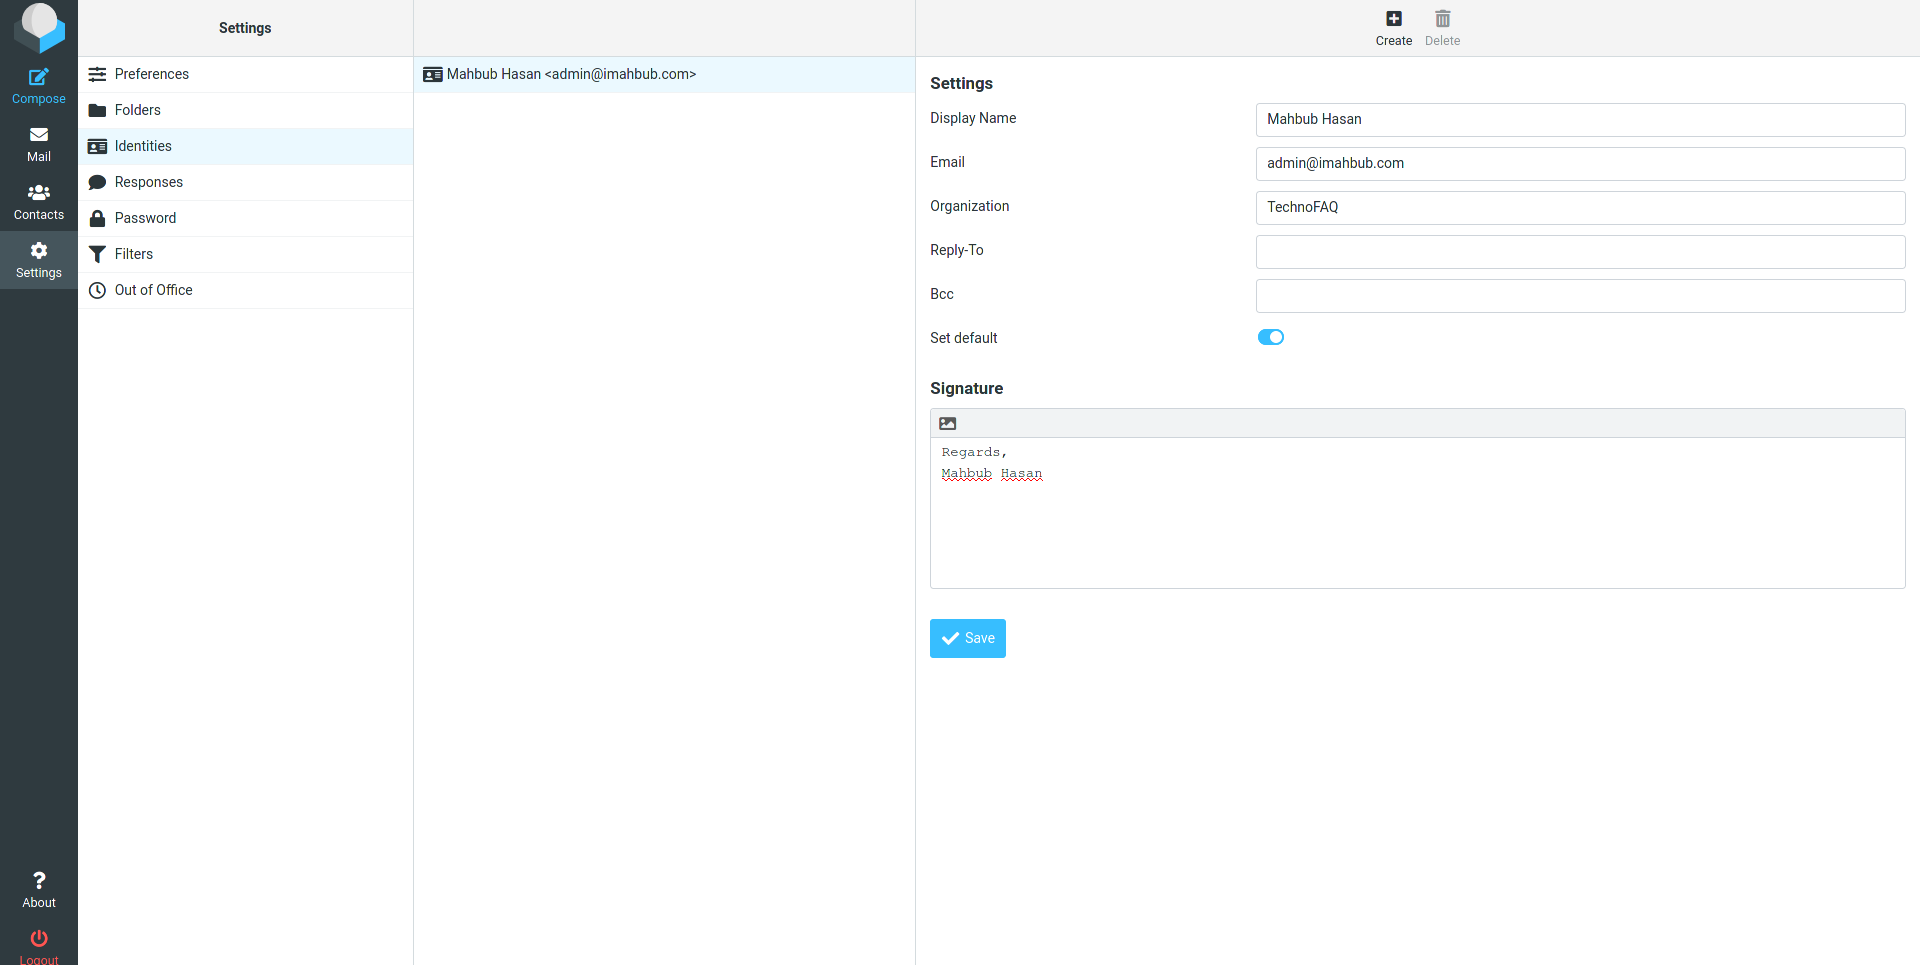
Your signature is tied to your identity in RoundCube. You can add one or more identities and edit the signatures of those identities. To edit your signatures, go to the Settings > Identities and select the identity you want to edit. You can then edit display names, description, reply to address and signature. You can also set an identity as default by toggling the “Set default” option.
How to manage and create folders in RoundCube?
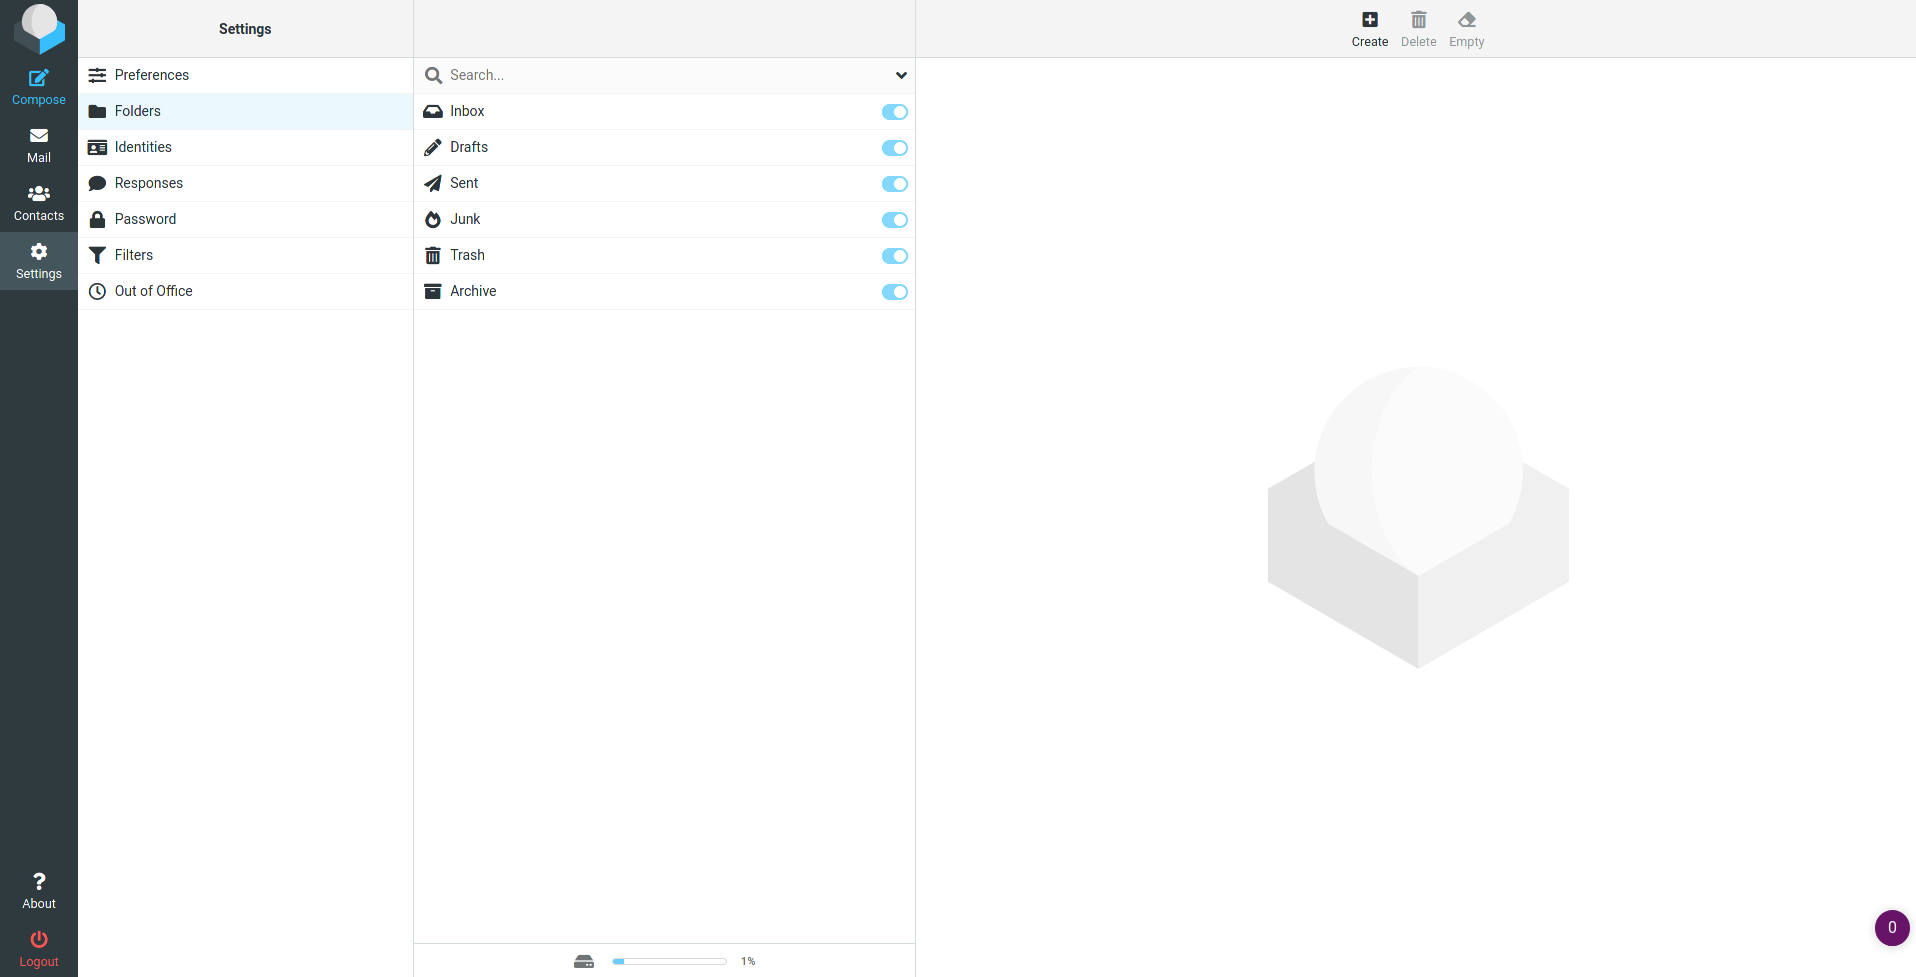
To manage folders in RoundCube, go to the Settings > Folders. Here you can toggle folders to be visible or hidden. You can also delete a folder by clicking on it, and then selecting Delete from the top menu bar. Remember that you cannot delete or disable default folders. You can only edit custom folders.
How to select multiple emails in RoundCube for performing actions?
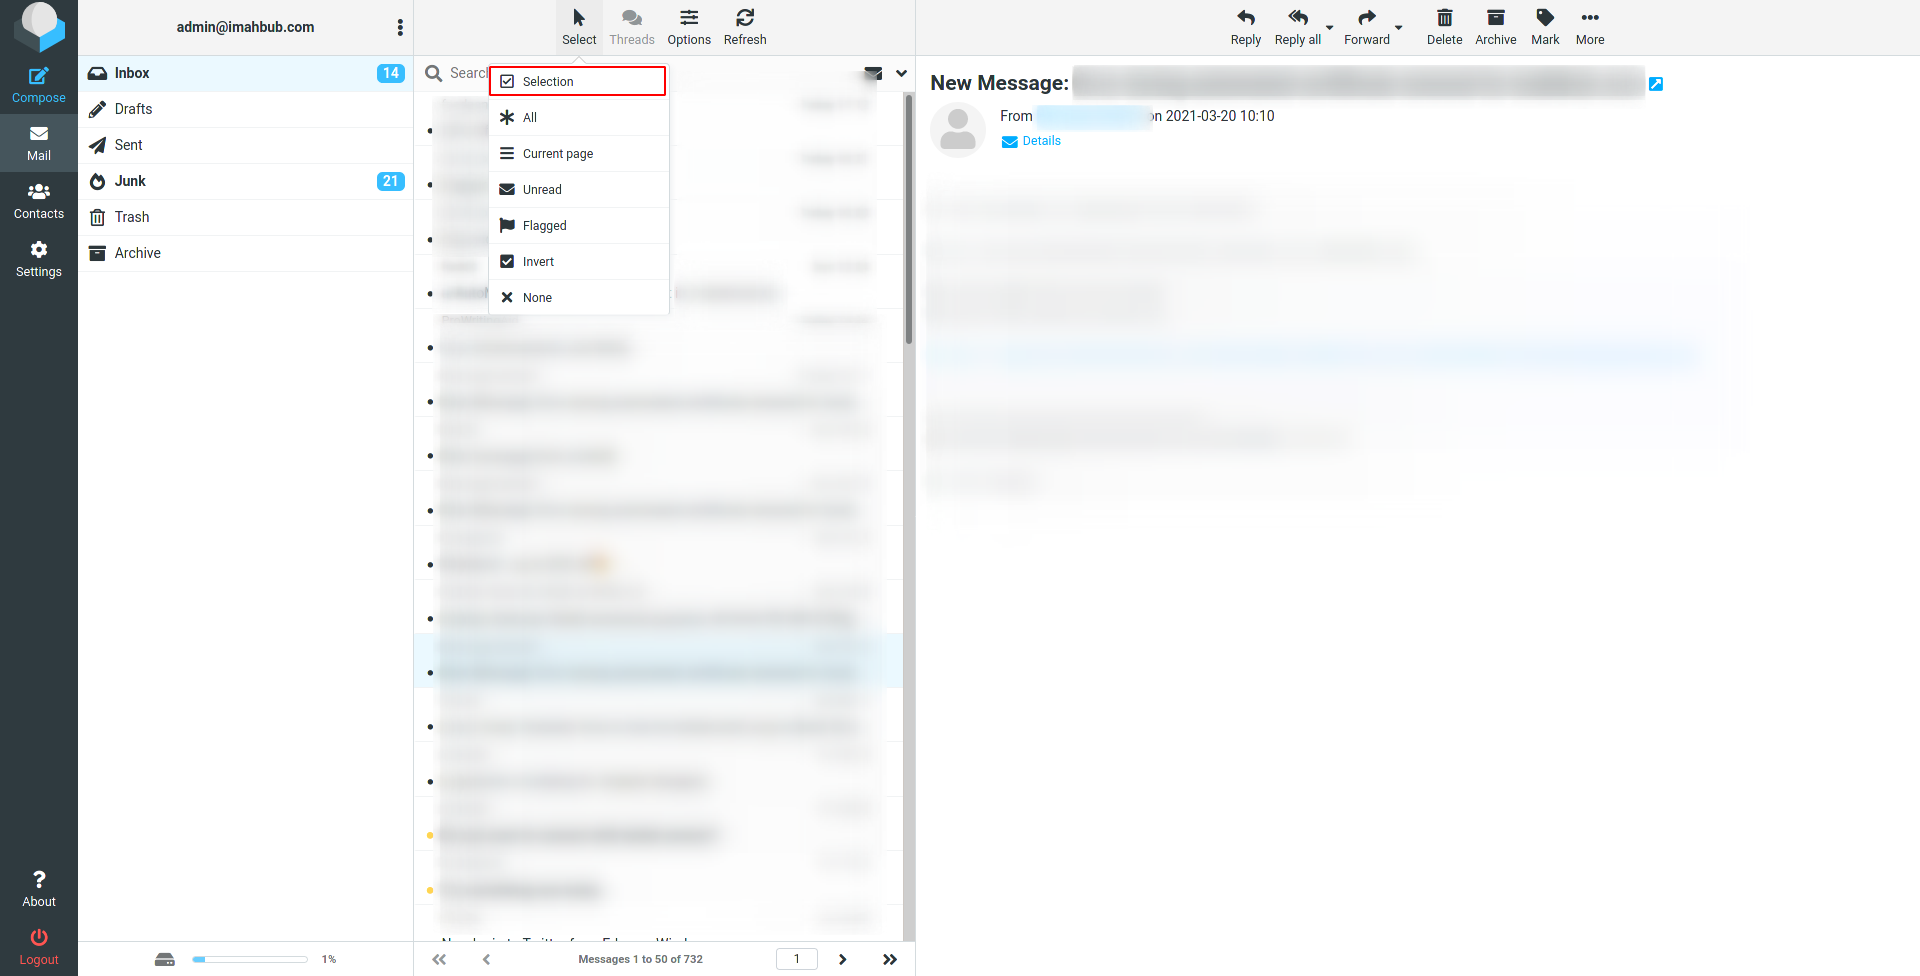
To select multiple emails for deleting, archiving, etc, you can click the Select option, select “Selection from the menu”. Checkboxes for selecting emails will appear and you can then select multiple emails to perform actions.
[TO BE CONTINUED]